dannylv100.com
  • Projects
    • A Game In the Dark
    • Flat Kingdom
    • Aero
    • 3rd Person Shooter
    • Forge Editor - Halo 5
    • Doom (2016) Design Test
  • Blog
  • Resume

How to make Checkpoints inside of UDK

5/27/2011

5 Comments

 
   Hey everyone! Today I am going to be demonstrating how to make checkpoints inside of UDK. Checkpoints are great for when you are making a single player game and you want the player to spawn nearby rather than at the start of the level.

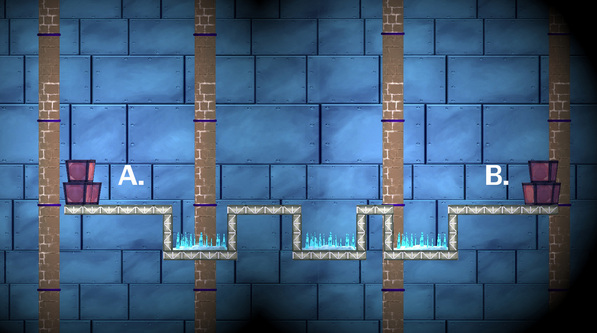
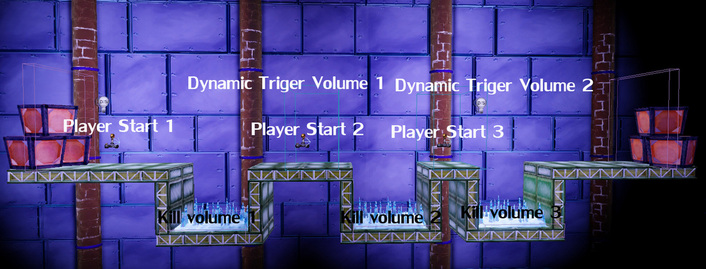
   So I made a quick level inside of the Freeze-E Frosty's editor. Nothing fancy, it is just essentially a straight line where the player needs to get from point A to point B. The only thing is that along the path are three spike pits. If the player were to fall into anyone of them they will die and be sent back to the start.
Picture
Build your level inside of UDK to look just like this. Make sure you can easily jump over the spike pits with a single jump.
   So lets begin. What you are going to want to do in your level is set up a player start. To set up a player start click on your level selecting the ground and right click -> Add Actor -> Add Player Start. So now if we were to walk forward and fall into the spike pit we would die and respawn back at point A.

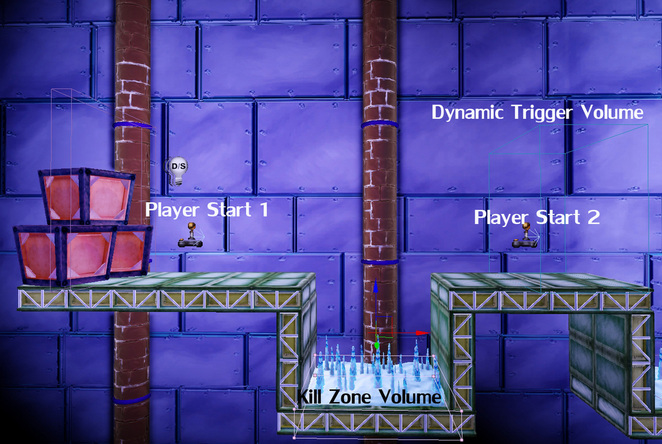
   To make a pit that will kill the player place the builder brush inside the pit and go to "Add Volume" button on the right side of the UDK screen. Select the "UTKillZVolume". (That volume stands for UT Kill Zone Volume.) Once you have it placed inside the pit go ahead and walk into it. The kill volume will kill you and once you respawn you will be back at the start. 
Picture
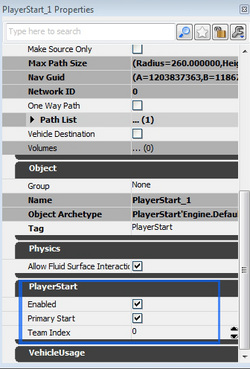
Make sure the first player start is enabled and is set to the Primary start.
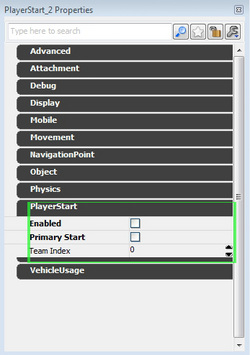
   So lets set up our first checkpoint. Using the builder brush build a DynamicTriggerVolume. To create a DynamicTriggerVolume go to right side of the UDK screen and find the "Add Volume" button. Right click on it and at the top of the list select DynamicTriggerVolume. Inside of that DynamicTriggerVolume place another player start. This time go into its properties and uncheck "Enabled" and "Player Start". You should have a player start a pit with a kill volume inside of it and on the other side of the pit a DynamicTriggerVolume with a second player start inside of it.
Picture
Every player start that comes after the first player start should be disabled.
Picture
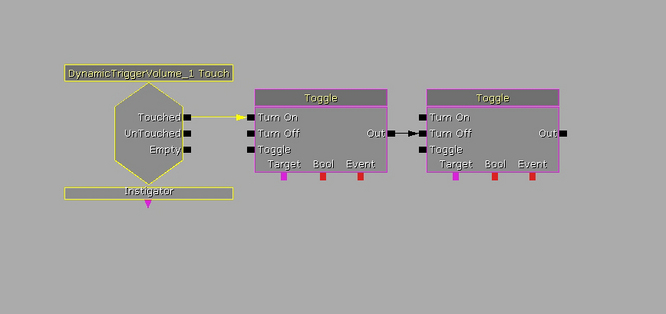
   The Next thing you are going to have to do is go into Kismet. To open up kismet find the green "K" next to the Generic Browser. Once Kismet is open go ahead and hold the "T" Key and click on the kismet work space. You should make a toggle kismet node appear. Do that again and make another one so you now have two. Link the output of the first toggle node to the "Turn Off" input of the second toggle node.

   Now go back to your level and select your DynamicTriggerVolume. Head back into kismet and right click in the kismet work space. Select New Event using "DynamicTriggerVolume 1" and once that node is made link it to the input of the first toggle node in the "on" input.
Picture
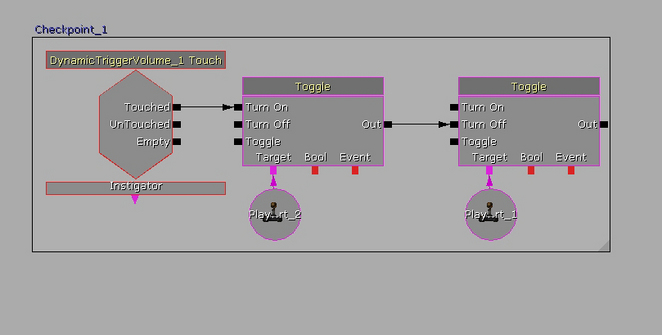
   Now go back into your level and select your first player start. Go into kismet and on the second toggle node right click on the "target" output and select "New object Var using player start 1". Select your second player start and do the same thing for your first toggle node.

   What we are telling kismet to do is to turn off the first player start when you touch the DynamicTriggerVolume. Once you make contact with the DynamicTriggerVolume it will then turn the second player start. Test it out. If you succeeded then whenever you fall in the pit you should respawn where you placed the second player start. Don't forget to build paths!
Picture
To add the box around the kismet nodes hold crtl and alt and drag select the nodes. Once you have all the nodes selected hit "C" and name the box.
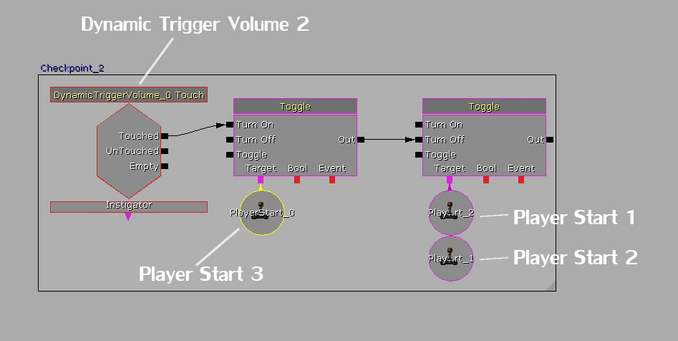
   Now you might be thinking that we still have another pit in the level and you're right we need to make another checkpoint. So what we are going to do is make a second DynamicTriggerVolume and a third player start. Just duplicate the volume and player start by selecting them, holding alt and dragging them. Once they are in place do the same thing you did for the first checkpoint but make sure to change a few things in kisemt.
Picture
   Inside of kismet we now turn on the second and first player start once the player touches the second DynamicTriggerVolume. We also make the second DynamicTriggerVolume turn on the third player start. If this was done correctly you will respawn on the third player start once you reach the second trigger volume.
Picture
http://www.youtube.com/watch?v=1OePC9mvAvo
   So whenever you want there to be a checkpoint make another DynamicTriggerVolume and turn off the player starts that came before. I hope this tutorial helps.

- Danny Q
@Dannylv100
​

5 Comments

Adding a flavor of the Jurassic.

5/22/2011

0 Comments

 
   It came to me one day. I was sitting in Richard Pau's room and we were talking to project lead Juan Valencia about what would be a cool addition to the game. We were talking about the factory breaking down and all the fires causing some sort of meltdown. I threw out the idea that the factory should have some icebergs in the background. Being a big fan of Easter eggs I jokingly said that one of the icebergs should have a frozen T-Rex. We all laughed at the thought but as we kept talking about it we realized that it was such a great idea. We came up with a scenario where the player would walk past the T-Rex on his way to his work station and when the factory blows up the players runs passed the iceberg only to find the T-Rex had reanimated and escaped.

  We planned out the rest of the story that day. When we came to the end we realized that the ending was literally just flipping a switch. We couldn't have the player beat a few levels just to flip a switch. I said that the T-Rex should reappear and attack the player as some sort of boss battle. We all laughed and then Juan turned to me and said "Make it happen" I turned to him and said "Where do I even begin?" and he replied "Deal with it".
Picture
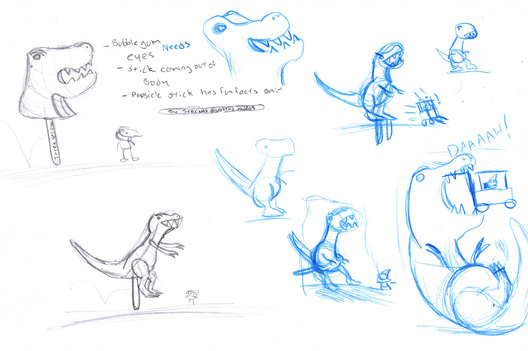
Some of the first few sketches I made of the T-Rex Popsicle. At first he was supposed to be a realistic dinosaur but that didn't feel right so we made it into a watermelon flavored popsicle.
 One of the first things I did was sketch out some ideas. At first I wanted the Rex to be realistic and terrifying, something that would drastically contrast the cartoony tone of the world. That idea went out the window fast. So we decided that in order to make any sense the Rex had to be made of ice cream. I suggested that he be a popsicle similar to the kind you would get at an ice cream truck. So after that was decided I sketched out what he would look like...I didn't have much success with the sketches but one thing we nailed down was that his flavor should be watermelon. That way his outsides would be green like a dinosaur and red like blood.

 When i first started sketching out the boss fight I had this idea which I completely took from the movie "Carnosaur".  In the movie this rampaging dinosaur is killed when the protagonist drives a forklift into the dinosaur impaling it and killing it. So for Freeze-E Frosty's We were going to pay homage to that scene and have Frosty drive a forklift straight into the belly of the Rex and scoop out it's insides. Due to time constraints that idea got scrapped. The Forklift is still in the game but the player can't drive it.
Picture
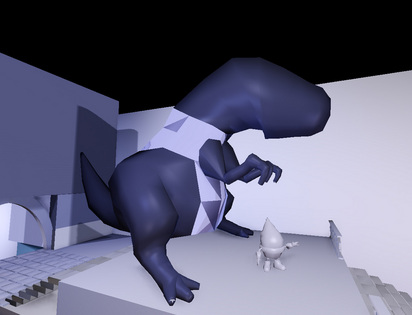
I made an early version of the Rex inside of ZBrush using Zspheres. This version of the Rex was never used in game.
  When the news broke out that we were adding a T-Rex boss fight into the game no one believed us. The guys on our team just looked at me as if I was telling some sort of joke. I wanted to prove to them how this absurd idea was going to happen. So that night I went into ZBrush and with Zspheres I whipped up a pretty decent looking beast. I then clumsily exported it out of Zbrush and into 3d max where I then uploaded it into UDK. When the team came in and saw the legendary tyrant lizard sitting literally in the middle of the game they just stared and knew that it was going to happen.
Picture
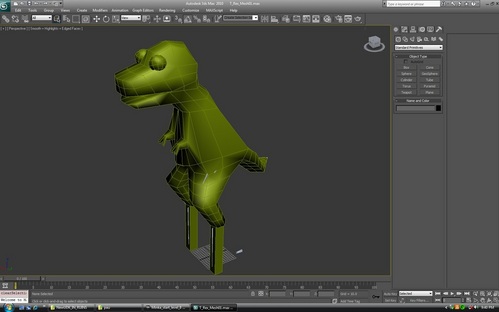
It was up to our artist Richard Pau to model the T-Rex. I remember him being pretty ticked about trying to nail something so abstract. I literally dug up this picture from the first week of modeling. This version was promptly thrown out in favor of the T-Rex we have in the game now.
 Now my ZBrush model was just for show. The real model was to be done by Richard Pau. We had a guy on our team draw some concept art for the Rex. What he came up with was a goofy looking dinosaur with popsicle sticks for legs. On paper it looked like it could work but when Richard began modeling it in 3d it just looked so bad. We dropped the model fast and decided to add some more to it, flesh it out some more. The next week we had the T-Rex you see in the game. I remember being skeptical at first about the popsicle stick legs but it ended up being one of the best things about the T-Rex.
Picture
We had to get a good texture for the Rex. We knew that we wanted it to be watermelon flavor for the skin and to have gumball eyes just like a popsicle you would get out of an ice cream truck. The texture we went with was done by Brian Shimamoto. Everyone called the pre-textured version of the Rex the robot Rex.
 It was a long process but with only seven weeks to spare I began to build the boss fight from the sketches in my notebook. Early on Frosty was going to battle the Rex on foot. After a certain number of phases the player would jump into the forklift and impale the beast. This idea wasn't plausible because the Rex was so big compared to Frosty it just didn't work. What I did was I added a walkway leading to the shutoff valve room, this way frosty would be able to fight the Rex at a level where he could actually see him. The only draw back to this was that the player couldn't see the popsicle stick legs. 
 
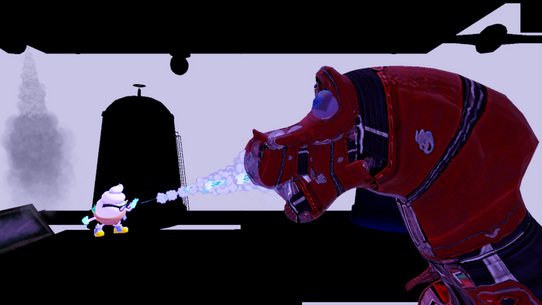
  When I was drawing the boss fight out on paper I knew I wanted it to be pieced out into three separate parts with an intro and an ending. It took seven weeks to get the three phases done correctly. The third phase was the hardest and most complicated. The first phase had the T-Rex come out and use some simple bite attacks to damage the player. He attacked in a simple pattern and was always vulnerable to be frozen. In the center of the boss fight area was a glowing red steam pipe. The player was to freeze the pipe causing it to burst and shoot steam directly at the T-Rex.
    
   It was simple enough but every phase got a little more complicated. In the second phase of the boss fight the Rex was much more aggressive and would attack the player with greater speed. He was always vulnerable to being frozen but even then the player would have to dodge diligently to avoid being overwhelmed by the sheer amount of attacks.
 
  The debugging process was about two weeks by itself. It was a lot of tweaks to the animation and attack patterns / damage / Hit points. It was during these weeks I worked on phase three. Phase three was already complete but it was the most complicated phase. For one the Rex had three standard attack patterns where he would swivel from place to place biting at the player and roaring. With each roar icicles would fall from the ceiling. He then has his Mega Roar and stomp combo where he would stomp send out a shock wave and roar causing a series of icicles to rain down on the player.
 
   What also made phase three unique was that the Rex is now invulnerable to being frozen and the key to beating him was no longer freezing a steam pipe. The key to his defeat was freezing this large ice cream sandwich that held this large steel pipes. Once the sandwich was destroyed the pipes fell and cracked some steam pips causing the T-Rex to be hit with large amounts of steam leaving him in a near death state. As he lay on the floor a swarm of army ants attack him. It was a very odd choice by us but hey we went with it.
 Below is a video demonstrating the rigging process our art lead Richard Pau went through to create the T-Rex. He made the model inside of Maya and the rig inside of 3D studio Max. He did a few of the animations. The rest of the animations were done by Tony Sanchez.
http://www.youtube.com/watch?v=lygLo3Vy3Nc
Picture
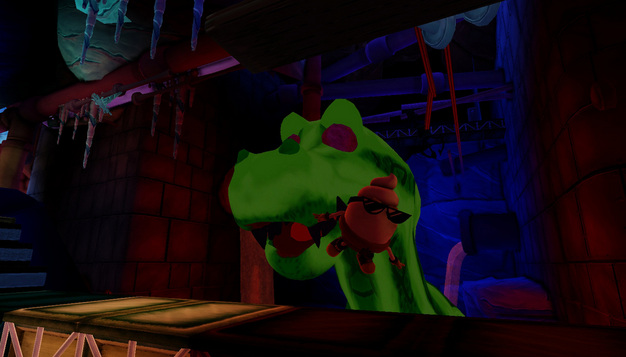
The final result was a memorable boss fight.
  All in all the weeks of work that went into to it paid off. It really goes to show how a crazy idea can really come together. Richard modeled it, Tony Sanchez animated it, Brian Shimamoto textured it and Juan Valencia said make it happen. It is definitely one of my proudest moments, seeing a random thought become reality.

- Danny Q
@dannylv100
​

0 Comments

Let's Talk About Cover

5/14/2011

0 Comments

 
   When making a first person shooter or a third person shooter adding cover to the level is one of the most important things. When developing a level for a single player experience we need to give the player enough cover so they can advance throughout the map and complete their objective. The cover in the map will allow the player to take time to reload, heal and think out strategies. One of the most important things you need to realize about cover is that it should keep the action flowing.
Picture
The player is completely exposed while his enemy is safe and secure. Not a good balance of cover at all
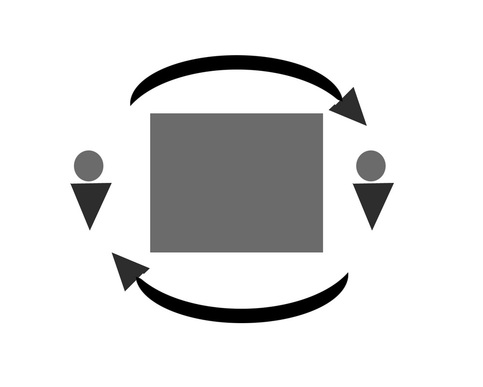
 If we break down cover to its purist form it essentially is anything that the player can hide behind. So if we were to build a map inside of UDK (Unreal Developers Kit), and make a large cube in the center of the map we would of effectively made cover. If we were to spawn an Ai (Artificial Intelligence) bot to attack the player the player can circle strafe in either direction to avoid incoming fire while also being able to return fire.
Picture
The player can attack from either side.
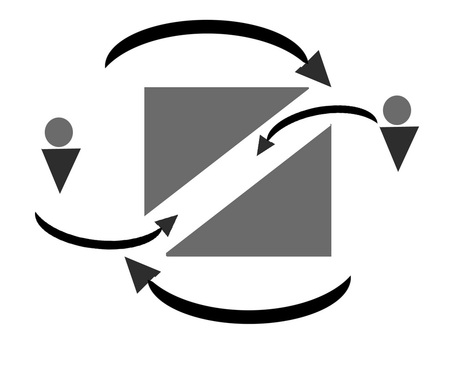
So now that we established that a simple cube can be used as cover, but how can we make it more interesting? A simple way to do that is to break it apart. Cutting a diagonal path through it will give the player even more options.
Picture
The player now has even more ways to attack.
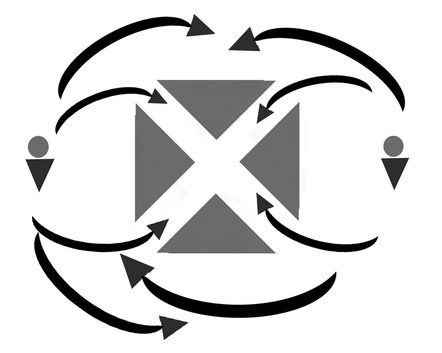
And if we continue to break the cube up even further we get something like this.
Picture
Now a simple cube has become a very interesting piece of cover.
 The game I am working on now is a  cover based third person shooter. There needs to be cover constantly available to the player. A general rule of thumb is that the player should be able to find cover within three seconds of leaving cover. No matter what kind of game you are making, first person shooter or third person the use of cover is very important.

- Danny Q
@Dannylv100
0 Comments

    Dannylv100

       I am an Indie Game and Level designer, Consultant and host of Divercast.

    Space Image
    Picture

    Picture
    Picture
    Picture
    Picture
    Picture
    Picture
    Picture
    Picture

    Picture


    Submit a Question
    Picture
    Picture
    Picture

    Picture
    Dannylv100 on Twitch

    How to support Dannylv100

    Popular Podcast Episodes:

    Episode 21
    Episode 24
    Episode 25

    DLC Episodes

    Ep1 - Misc Movie Talk
    ​Ep2 - Gears 4 Impression
    ​Ep3 - A-plaque-alypse​

    Popular Indie Arcade:

    Indivisible
    ​The Night That Speaks
    ​Greedy Guns
    ​

    Popular Posts:
    Frosty's - Now on Itch.io
    How to make checkpoints....
    The Wanderer: A New Infe...

    Monthly Blog Archive

    WWP Appearance
    E3 Survival Guide
    ​Gears 4 - COG Hammerburst ​
    Knights vs Ninjas (Part 1)
    Halo 5: Warzone Accessibility 
    Halo 5: REQ Card Redesign
    ​
    New The Last of Us Enemy
    GDC 2014 Video Roundup
    ​Mass Effect 3: Tracker Class
    Mass Effect 3: DLC classes 
    ​Frosty's: Lost Levels
    ​
    Frosty's: Soundtrack
    ​Importing to UDK from Max
    ​Basic Checkpoints (UDK)
    ​
    Physics vs Scripted Events
    Picture

    Categories

    All
    Blog Post
    E3
    FF Level Design
    Flash Game
    Forge
    Forge Creation
    Freeze E Frosty
    Game Design
    Game Design Doc
    Gears Of War
    Halo 5
    In Defense Of
    Indie Arcade
    Indie Dev
    Iphone
    Iphone Game
    Itch.io
    Level Design
    Level Design 101
    Lost Chapters
    Podcast
    Steam
    Support This Site
    Thoughts
    Tutorial
    Twitch
    Udk
    Unity
    Youtube


    Archives

    September 2018
    August 2018
    July 2018
    June 2018
    May 2018
    April 2018
    February 2018
    December 2017
    October 2017
    September 2017
    August 2017
    July 2017
    June 2017
    May 2017
    April 2017
    March 2017
    February 2017
    January 2017
    December 2016
    November 2016
    October 2016
    September 2016
    August 2016
    July 2016
    June 2016
    May 2016
    April 2016
    March 2016
    February 2016
    January 2016
    December 2015
    November 2015
    October 2015
    September 2015
    August 2015
    July 2015
    June 2015
    May 2015
    April 2015
    March 2015
    February 2015
    December 2014
    November 2014
    October 2014
    September 2014
    August 2014
    July 2014
    June 2014
    May 2014
    April 2014
    March 2014
    February 2014
    January 2014
    December 2013
    September 2013
    July 2013
    June 2013
    April 2013
    February 2013
    January 2013
    December 2012
    November 2012
    October 2012
    September 2012
    August 2012
    July 2012
    June 2012
    May 2012
    April 2012
    March 2012
    February 2012
    January 2012
    November 2011
    October 2011
    September 2011
    August 2011
    June 2011
    May 2011

    RSS Feed

Powered by Create your own unique website with customizable templates.