
Hey everyone! Today I am going to be demonstrating how to make checkpoints inside of UDK. Checkpoints are great for when you are making a single player game and you want the player to spawn nearby rather than at the start of the level.
So I made a quick level inside of the Freeze-E Frosty's editor. Nothing fancy, it is just essentially a straight line where the player needs to get from point A to point B. The only thing is that along the path are three spike pits. If the player were to fall into anyone of them they will die and be sent back to the start.
So I made a quick level inside of the Freeze-E Frosty's editor. Nothing fancy, it is just essentially a straight line where the player needs to get from point A to point B. The only thing is that along the path are three spike pits. If the player were to fall into anyone of them they will die and be sent back to the start.
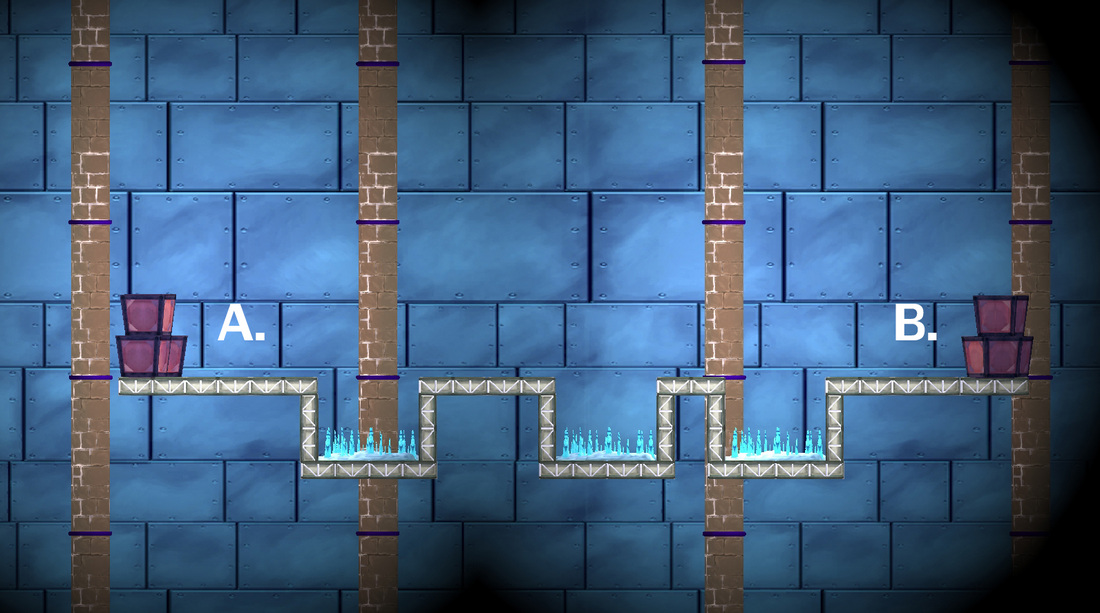
Build your level inside of UDK to look just like this. Make sure you can easily jump over the spike pits with a single jump.
So lets begin. What you are going to want to do in your level is set up a player start. To set up a player start click on your level selecting the ground and right click -> Add Actor -> Add Player Start. So now if we were to walk forward and fall into the spike pit we would die and respawn back at point A.
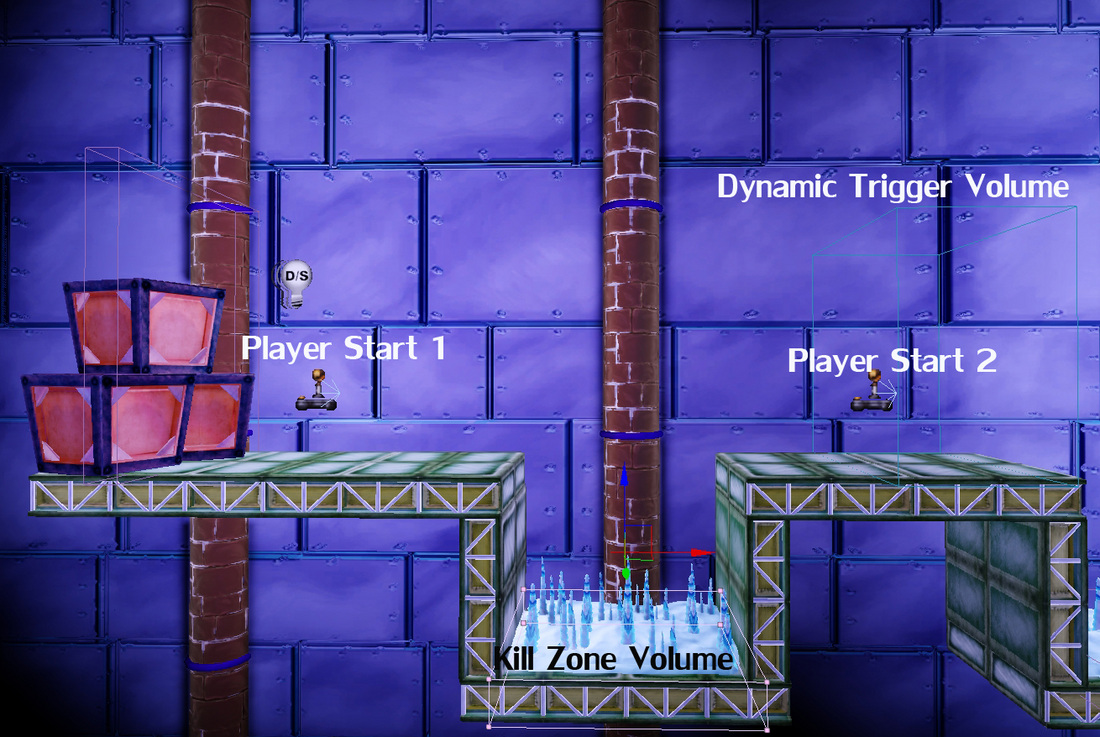
To make a pit that will kill the player place the builder brush inside the pit and go to "Add Volume" button on the right side of the UDK screen. Select the "UTKillZVolume". (That volume stands for UT Kill Zone Volume.) Once you have it placed inside the pit go ahead and walk into it. The kill volume will kill you and once you respawn you will be back at the start.
To make a pit that will kill the player place the builder brush inside the pit and go to "Add Volume" button on the right side of the UDK screen. Select the "UTKillZVolume". (That volume stands for UT Kill Zone Volume.) Once you have it placed inside the pit go ahead and walk into it. The kill volume will kill you and once you respawn you will be back at the start.
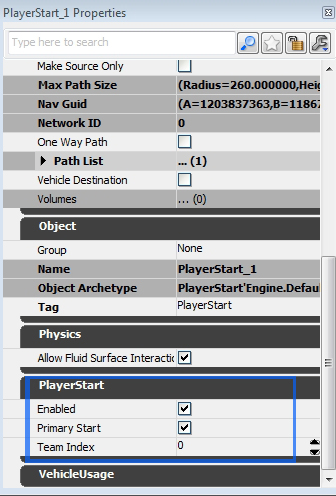
Make sure the first player start is enabled and is set to the Primary start.
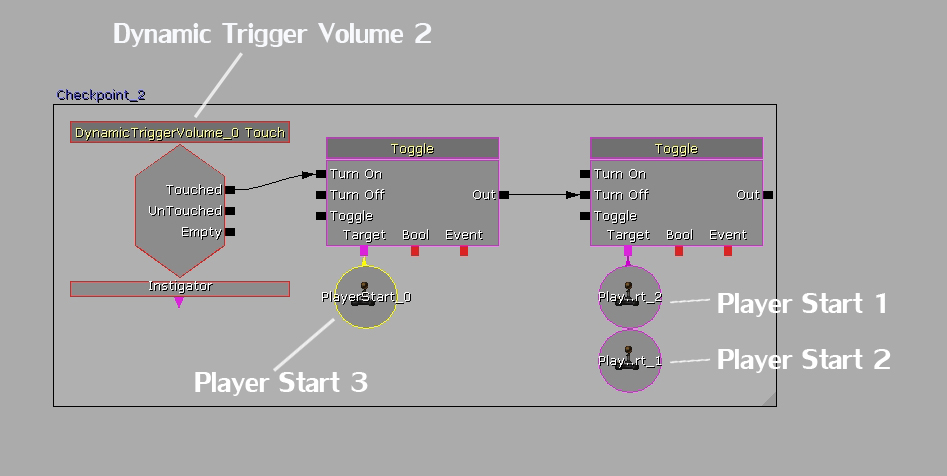
So lets set up our first checkpoint. Using the builder brush build a DynamicTriggerVolume. To create a DynamicTriggerVolume go to right side of the UDK screen and find the "Add Volume" button. Right click on it and at the top of the list select DynamicTriggerVolume. Inside of that DynamicTriggerVolume place another player start. This time go into its properties and uncheck "Enabled" and "Player Start". You should have a player start a pit with a kill volume inside of it and on the other side of the pit a DynamicTriggerVolume with a second player start inside of it.
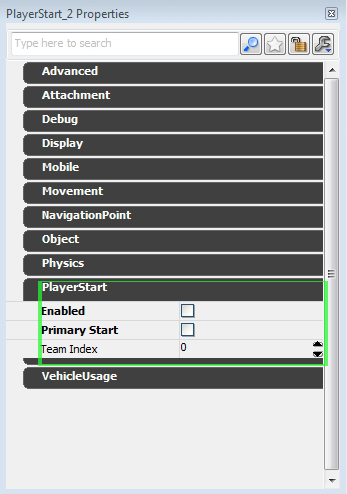
Every player start that comes after the first player start should be disabled.
The Next thing you are going to have to do is go into Kismet. To open up kismet find the green "K" next to the Generic Browser. Once Kismet is open go ahead and hold the "T" Key and click on the kismet work space. You should make a toggle kismet node appear. Do that again and make another one so you now have two. Link the output of the first toggle node to the "Turn Off" input of the second toggle node.
Now go back to your level and select your DynamicTriggerVolume. Head back into kismet and right click in the kismet work space. Select New Event using "DynamicTriggerVolume 1" and once that node is made link it to the input of the first toggle node in the "on" input.
Now go back to your level and select your DynamicTriggerVolume. Head back into kismet and right click in the kismet work space. Select New Event using "DynamicTriggerVolume 1" and once that node is made link it to the input of the first toggle node in the "on" input.

Now go back into your level and select your first player start. Go into kismet and on the second toggle node right click on the "target" output and select "New object Var using player start 1". Select your second player start and do the same thing for your first toggle node.
What we are telling kismet to do is to turn off the first player start when you touch the DynamicTriggerVolume. Once you make contact with the DynamicTriggerVolume it will then turn the second player start. Test it out. If you succeeded then whenever you fall in the pit you should respawn where you placed the second player start. Don't forget to build paths!
What we are telling kismet to do is to turn off the first player start when you touch the DynamicTriggerVolume. Once you make contact with the DynamicTriggerVolume it will then turn the second player start. Test it out. If you succeeded then whenever you fall in the pit you should respawn where you placed the second player start. Don't forget to build paths!

To add the box around the kismet nodes hold crtl and alt and drag select the nodes. Once you have all the nodes selected hit "C" and name the box.
Now you might be thinking that we still have another pit in the level and you're right we need to make another checkpoint. So what we are going to do is make a second DynamicTriggerVolume and a third player start. Just duplicate the volume and player start by selecting them, holding alt and dragging them. Once they are in place do the same thing you did for the first checkpoint but make sure to change a few things in kisemt.

Inside of kismet we now turn on the second and first player start once the player touches the second DynamicTriggerVolume. We also make the second DynamicTriggerVolume turn on the third player start. If this was done correctly you will respawn on the third player start once you reach the second trigger volume.
So whenever you want there to be a checkpoint make another DynamicTriggerVolume and turn off the player starts that came before. I hope this tutorial helps.
- Danny Q
@Dannylv100
- Danny Q
@Dannylv100


 RSS Feed
