
Here is an idea I had for a game,It's called Knights vs Ninjas (If you couldn't tell). The game has a very simple premise. The Idea is that you pick your character, Knight or Ninja and embark on a journey through Arthurian legends and medieval Japan to find a mysterious treasure and do battle with your rivals. In the short the plot is just something that gets our characters fighting.
Visually the game is a mix of Castle Crashers and Super Smash Bros. The gameplay is also very similar. Players engage in arenas that take place in Medieval England and Japan. The player who can defeat enough opponents by either depleting their hit points or knocking them out of bounds is the winner. The game goes up to four players and will feature a quick single player story mode for each character. The single player is more or less used as a way to teach the player the gameplay concepts and mechanics.
Visually the game is a mix of Castle Crashers and Super Smash Bros. The gameplay is also very similar. Players engage in arenas that take place in Medieval England and Japan. The player who can defeat enough opponents by either depleting their hit points or knocking them out of bounds is the winner. The game goes up to four players and will feature a quick single player story mode for each character. The single player is more or less used as a way to teach the player the gameplay concepts and mechanics.
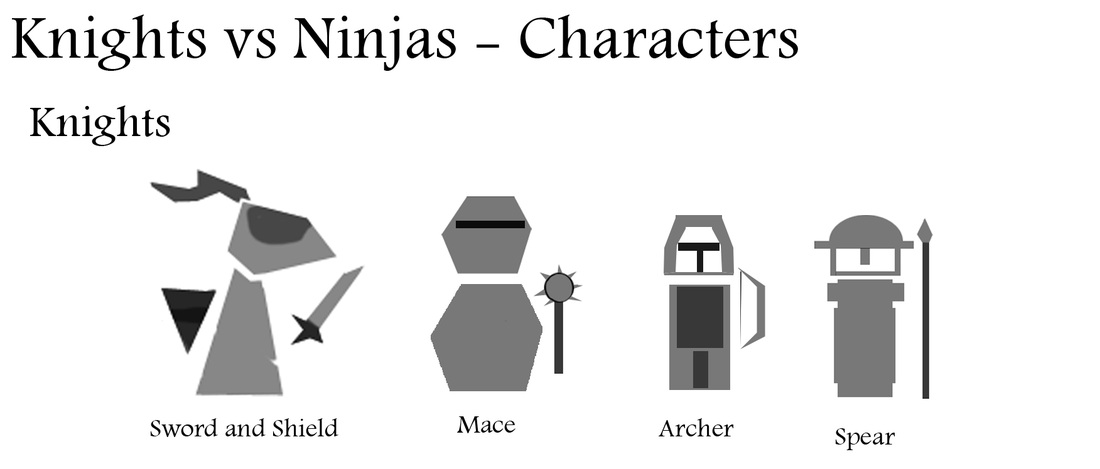
Characters
Knights are better at defense and have higher hit points. They are also very slow compared to the ninjas.
Knights
Sword and Shield Knight - He is the most well rounded character on the Knight's team. He is easy for a beginner to pick up and learn. He has good offense and defensive capabilities.
His weapon upgrade is a flaming claymore sword. He looses a bit of speed but deals more damage. His defense also increase slightly.
Stats:
Defense: 7/10
Attack: 7.5 /10
Speed: 7/10
Mace Knight - This night is clad is heavy armor and is the slowest. His mace deals a lot of damage but he swings at a slower rate than the other knights.
His weapon upgrade is a giant mace that has a wide arc when swung. These attacks deal massive damage when they connect but are easily dodged.
Stats:
Defense: 8.5/10
Attack: 9 /10
Speed: 6/10
Archer - The archer specializes in ranged attacks and speed. The archer also has the highest jump of all the knights and can double.
The upgrade to the archer is a crossbow that fires flaming arrows. The cross bow is slower than his bow but it deals more damage and the flame arrows have a small Damage over time effect (DoT).
Stats:
Defense: 7/10
Attack: 7.5/10
Speed: 9/10
Spear Knight - The spear knight is a good combination of quick attacks and speed at a cost of armor. He can charge his attacks for more damage but these attacks will leave him vulnerable.
His weapon upgrade is a lance. The lance has increased range allowing him to reach enemies that would normally be out of reach. The lance isn't much stronger than his spear but it does slightly boost his defensive properties.
Stats:
Defense: 6.5/10
Attack: 8/10
Speed: 8.5/10
Ninjas can jump higher than knights and can attack and run much quicker. They have lower hit points and defensive capabilities.
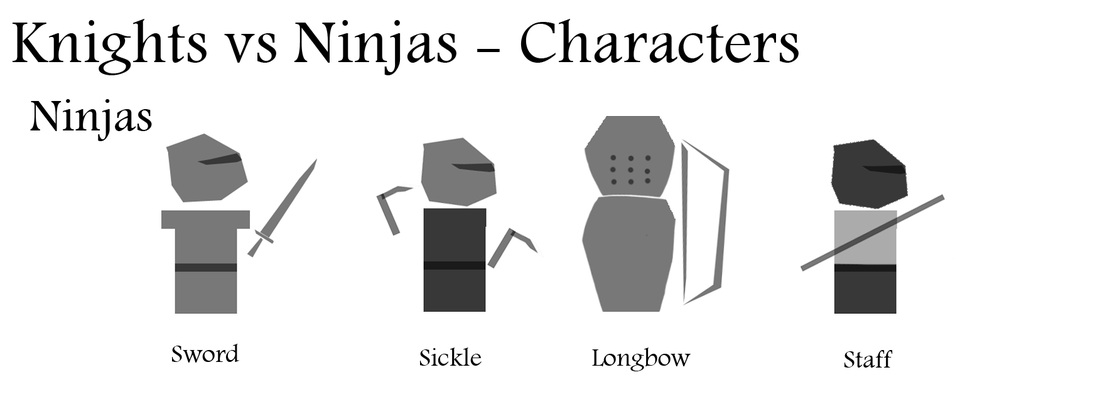
Ninjas
Sword Ninja - The sword ninja is the most well rounded ninja. He is quick and has good defensive capabilities. Although not as well armored as his Knight counterpart he is much faster.
His weapon upgrade is a second sword. With the second sword is capable of attacking faster without losing speed or jumping ability. His attack power is slightly decreased when he has his second sword equipped.
Stats:
Defense: 7/10
Attack: 7.5/10
Speed: 8/10
Sickle Ninja - The sickle ninja can attack quickly up close but his ranged attacks are weak. His weapon upgrade attaches a chain in between his sickles allowing formore range. The sickles are also flaming adding a slight damage boost and DoT.
Stats:
Defense: 6.5/10
Attack: 8/10
Speed: 8.5/10
Longbow Ninja Monk - This ninja specializes in long range attacks. His bow does more damage than the bow of the Knight's archer. His bow takes more time to charge but can deal significant damage.
His weapon upgrade is a hankyu (a short bow). This allows him to move around the map with greater ease and to fire more arrows much more rapidly but it deals less damage.
Defense: 7.5/10
Attack: 8.5/10
Speed: 7.5/10
Staff Ninja - The staff ninja does not have a lot of defense points but he can strike quickly and precisely. His attack power is much more limited due to his weapon having no blade but he makes up for it with his speed.
His weapon upgrade is a flaming Naginata. He is able to deliver a good amount of damage quickly and his defense points go slightly without the loss of speed.
Defense: 6/10
Attack: 7/10
Speed: 8.5/10
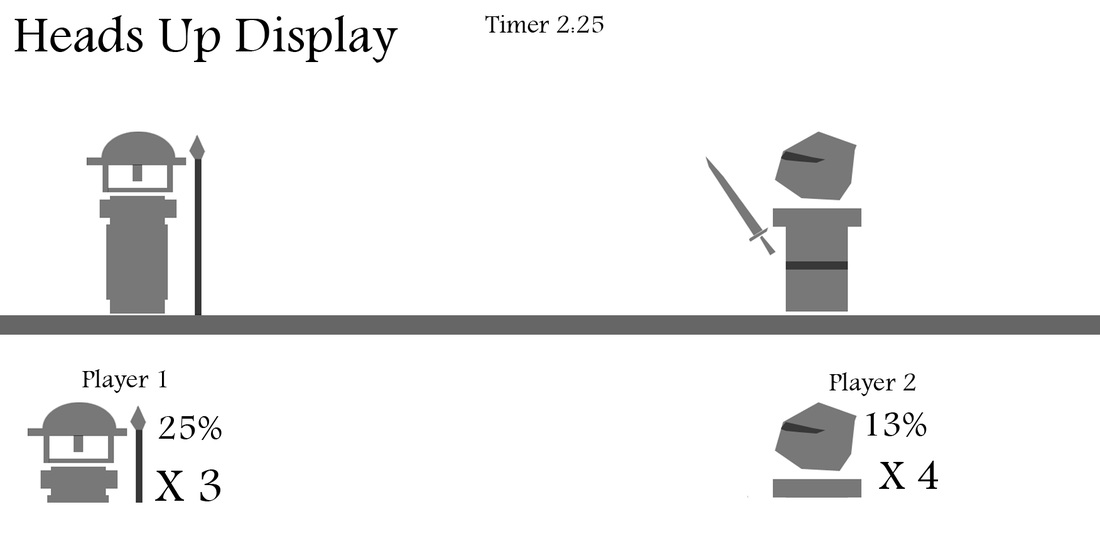
Heads Up Display
Power-Ups
Power-Ups are dropped on the map randomly throughout the match. They are dropped occasionally and there are no more then one dropped on the map at a time. Players can choose when to activate their power-up during the match. To prevent one player from obtaining all the power-ups players can only hold one at a time. Once the power-up is used it is immediately discarded.
- Weapon Upgrade
- Speed Boost
- Invincibility
- Speed Boost
- Invincibility

Weapon upgrade - This power-up is dropped randomly throughout the map just like the other power-ups. This power-up upgrades the players character with a more powerful version of their weapon. For example the knight with the sword and shield gets a claymore and the staff ninja gets a naginata. This power up ends up after about thirty seconds.
Speed Boost - The speed boost power-up is dropped randomly throughout the map just like the other power-ups. This power up doubles the speed of any character that uses it. This power up ends up after about thirty seconds.
Invincibility - The invincibility power-up is dropped randomly throughout the map just like the other power-ups. This power up makes the player completely invincible to all and any attacks for thirty seconds. The player that picks up this power-up loses the ability to double jump as long as it is active. This power-up is immediately turned off if the player falls off the stage or goes out of bounds.
Pick-up items
Health - When picked up the player will regain hit points.
Abilities
- Jump
- Double Jump
- Ranged Attacks
- Melee
- Dodge
- Double Jump
- Ranged Attacks
- Melee
- Dodge
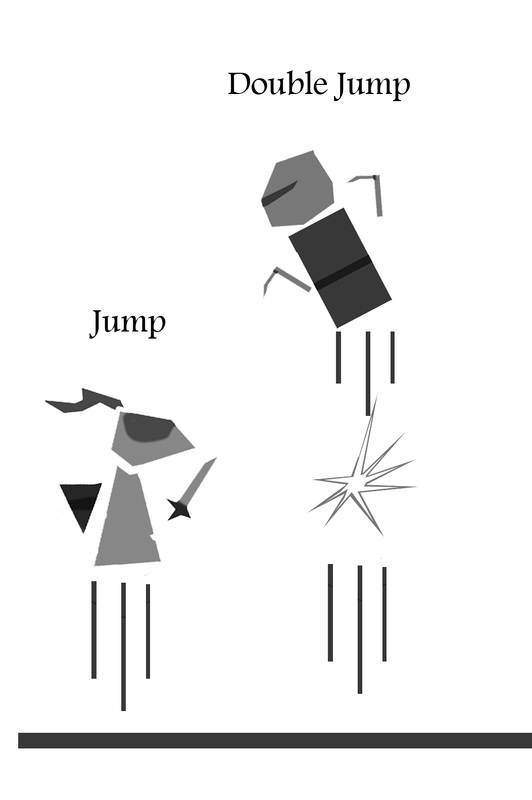
To double jump press the jump button again once in the air.
Jump and double jump - Players are capable of jumping as a means of traversal and as a means of dodging incoming attacks. If a player would like to double jump all they need to do is hit the jump button again once they are in the air.
Every character in the game can jump and double jump. Depending on how heavy the character is determines how high they can jump and double jump. Ninjas are well suited for jumping where as the knights are better at defending themselves from attacks.
Every character in the game can jump and double jump. Depending on how heavy the character is determines how high they can jump and double jump. Ninjas are well suited for jumping where as the knights are better at defending themselves from attacks.
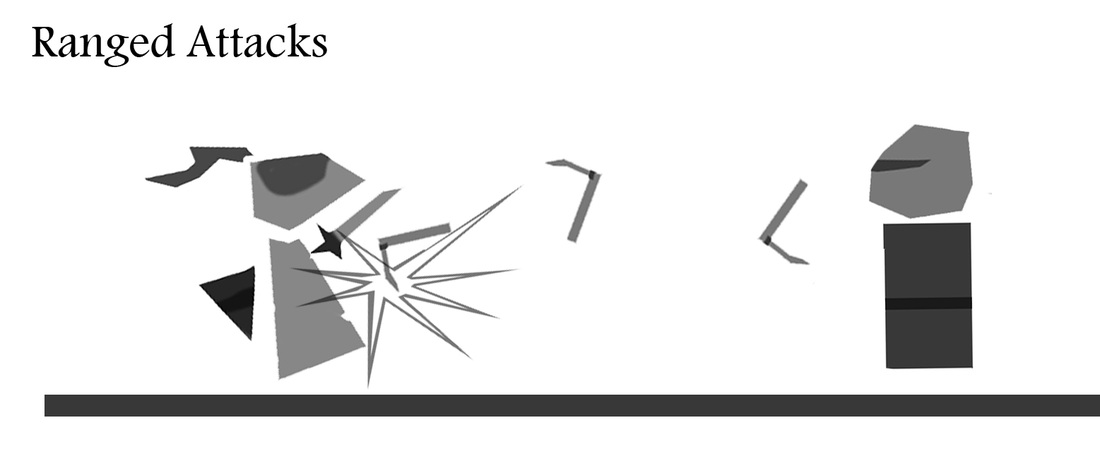
Ranged Attacks - Every character has a ranged attack. Ranged attacks are attacks that can be done from a safe distance to attack an opponent. Certain characters specialize in ranged attacks. The knights and the ninjas both have an archer character that specializes in ranged attacks.
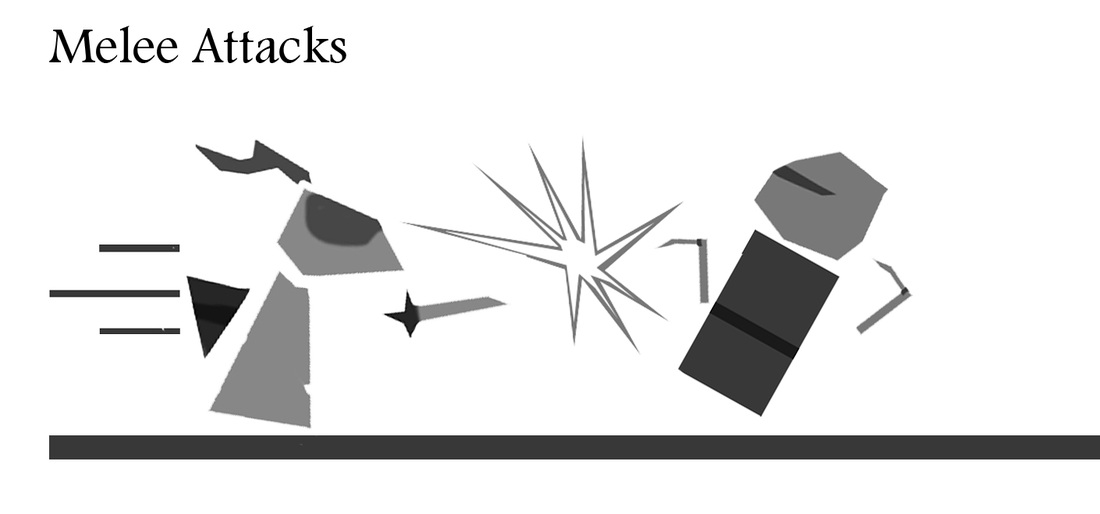
Melee Attacks - Every character in the game has melee based attacks. Certain classes specify in melee fighting. Melee attacks can be utilized in combination of one another to unleash devastating combos.
Different characters have different melee attack speeds. Some characters can attack quickly and in great succession where others have a longer wind up time but deliver more damage.
Different characters have different melee attack speeds. Some characters can attack quickly and in great succession where others have a longer wind up time but deliver more damage.
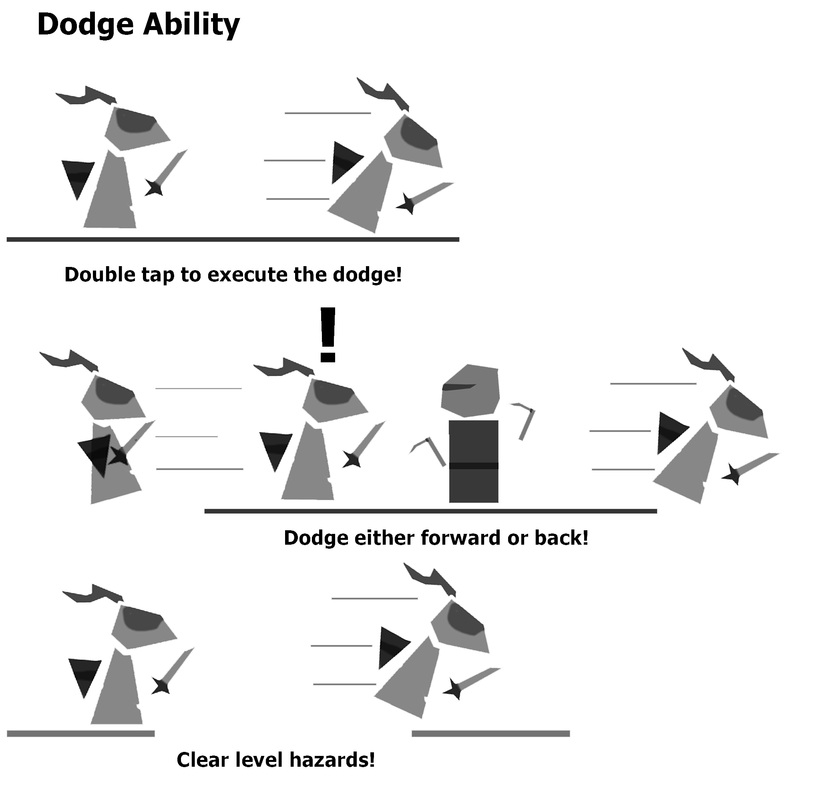
Dodge Ability - The dodge allows the player to utilize a quick burst of speed either forward or backwards to dodge an oncoming attack. This ability is used by tapping right or left quickly.
What makes this ability fun is its potential to be incorporated into combat and area traversal. Combat wise we can use it to quickly get behind and enemy and attack them. We can use it to jump back and then strike with a powerful counter blow. If we are up against an enemy with ranged attacks we can use the dodge to close the distance without being hit.
The doge can even be combined with the jump and double jump ability. It can make aerial dodges and even mid air combos where player can knock an opponent in the air, dodge behind them and land a powerful blow before landing to the ground.
This ability can be used for traversal as well. The player can use it to cross a map faster or to help get across a pit or obstacle in the map. This ability gives the player a lot of options and it adds another level of game play and skill. It is an ability that is easy to learn but hard to master.
Terrain Types
- Solid
- Can jump through
- Destructible
- Sloped
- Hazardous
- Slippery
- Jump-pads
- Moving
- Water
- Can jump through
- Destructible
- Sloped
- Hazardous
- Slippery
- Jump-pads
- Moving
- Water
Solid - These are things in the level that can not be phased through. Players can jump on these pieces of terrain but can not phase through them or break them. Most stages are comprised of this kind of terrain.
Can Jump Through - These are things that the player can jump through and jump down from. Things such as tree branches, crates, floorboards and etc.
Destructible - These are things in the level that can be destroyed if they take enough damage. Things such as trees can be knocked over and destroyed. Certain crates can be broken up as well.
Sloped - Sloped terrain is hard to run up but easy to run down on.
Hazardous - There are things in the environment that are dangerous. Things such as fires, pits, dragons and etc. These things can either injure or kill the player if they were to walk into them.
Slippery - This refers to parts of the terrain that are either covered with ice, mud, ooze etc. These things cause the player to slide around a bit and lose some traction. This isn't necessarily a hazard, in fact it can be used in conjunction with the speed boost the player will send them self flying across the map.
Jump-pads - These are places in the terrain that act as a trampoline. Players can jump on these pieces of terrain to get a extra jump boost.
Moving - These are pieces of the terrain that move. Certain maps will have moving terrain pieces. Such as crates, logs, boats etc. These pieces of terrain can be destructible or solid.
Water Terrain – This terrain type is used to help break up the battlefield a bit. The way it functions is fairly simple.
When the player is in the water there ability to jump will be slowed. The player can use the dodge to quickly traverse through the water. The speed of players walks and runs are slowed in water.
Water is also something that can be used to extinguish flames. If a player is hit by a flaming arrow they can hop into the water to put out the flames. The same would happen if the player was holding a flaming weapon. If they were to walk into the water it would be put out.
Levels
Level - 1 Sword in the Stone
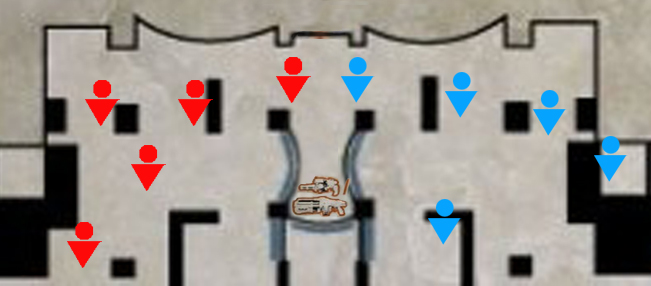
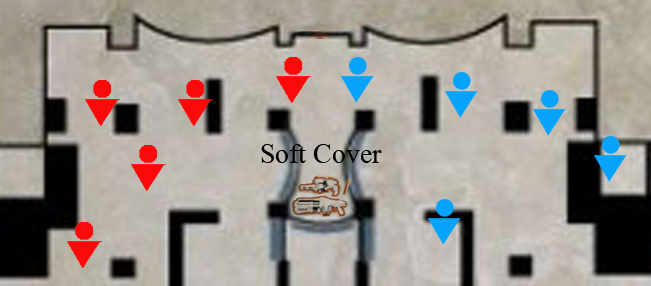
This level is based on the Arthurian legend of Excalibur. The level is set in the deep mystical woods of medieval England. The woods are thick and light can barely shine through the trees. This forest where the legendary blade rests, set in stone. The sword will be in the background visible to the players. Sunlight will shine down on it as leaves gently fall down around it.
The other parts of the forest are very dark and moody. There will be lots of space for close and long range combat. Players can jump into trees to continue fighting or to sit back and launch long range attacks from the safety of the treetops.
To the right of the map is a small pit with a log in it. The log rolls up and down this pit and any player unlucky enough to make contact with the log will take damage. It rolls at a fairly slow pace and it easy to avoid with a simple dodge or jump.
Certain parts of the map may have muddy terrain that will cause the player to lose traction and slip. The sloped area at the left of the map is one such area where the player will lose traction.
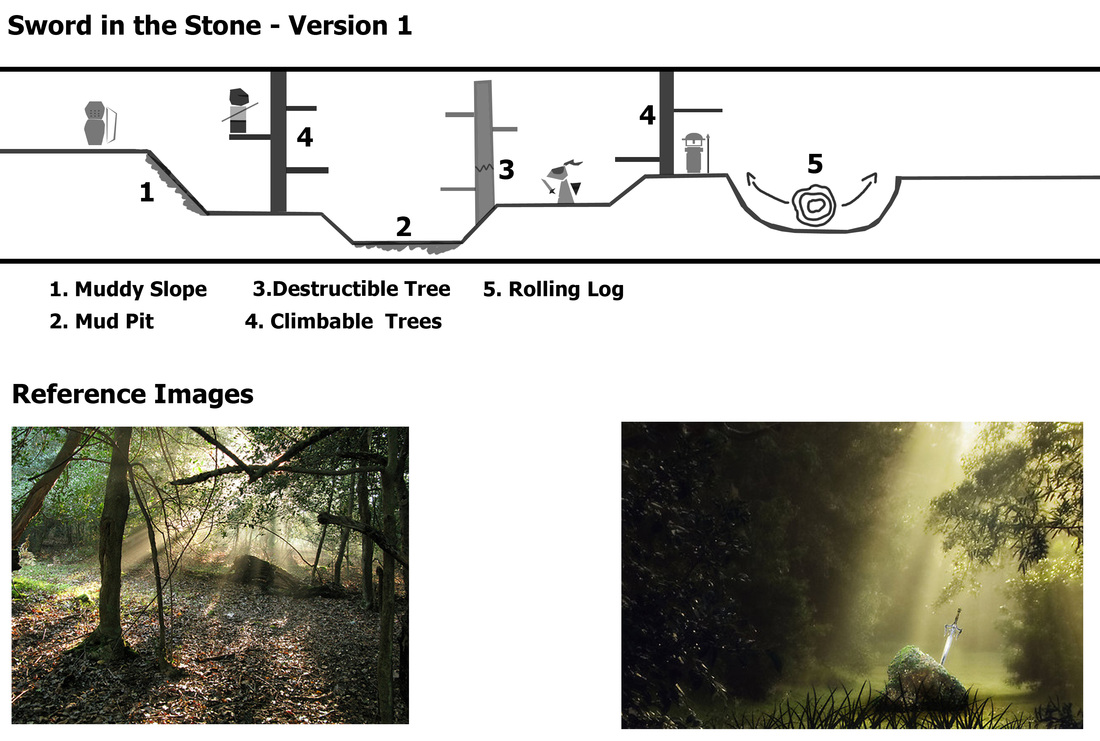
Sword in the Stone : Version 1
In my first pass at this level I wanted something with slightly varied terrain but I also wanted to keep it simple and balanced. I was looking at this map as being a map where novice players can learn to play the game. I wanted to include a few simple things such as a level hazard that wasn’t too punishing and some muddy terrain so the players gets and idea of what other stages might feature.
In my first pass at this level I wanted something with slightly varied terrain but I also wanted to keep it simple and balanced. I was looking at this map as being a map where novice players can learn to play the game. I wanted to include a few simple things such as a level hazard that wasn’t too punishing and some muddy terrain so the players gets and idea of what other stages might feature.
- This sloped part of the map is covered with mud. This will make it hard for a player running up the slope to reach the top. If another player is already on top and is using ranged attacks this break the design. So what I did was I included a tree nearby so a player can avoid the slope and use the branches of the tree to jump toward the top of the hill.
- The center of the map has a small pit full of mud. When players reach the center of this map they will end up sliding around a bit. The pit isn’t too deep, it is designed to be easily jumped over using the double jump or the dodge/evade maneuver. The trees nearby also allow the player to avoid the mud pit.
- I wanted to add another game play element here. This tree has a low branch allowing a player to access it very easily so they can jump across the mud pit. The main functionality of this tree is that it is destructible. If the player were to damage it enough it will fall over to the left side of the map. This will effectively make a bridge for the players to use.
- These trees are easily accessible to the player via the jump. Players can reach these trees very easily with a simple jump. The tree on the left allows the player to reach the top of the hill as well as clear the pit. The left tree gives the player enough height so they can avoid the rolling log.
- The rolling log is a very simple to avoid level hazard. I included this because I wanted to teach the player that some maps will have level hazards. The log rolls back and forth slowly and is no real threat. If it hits the player it will knock off a few hit points but not much. Players knock their opponents into the pit to inflict damage.
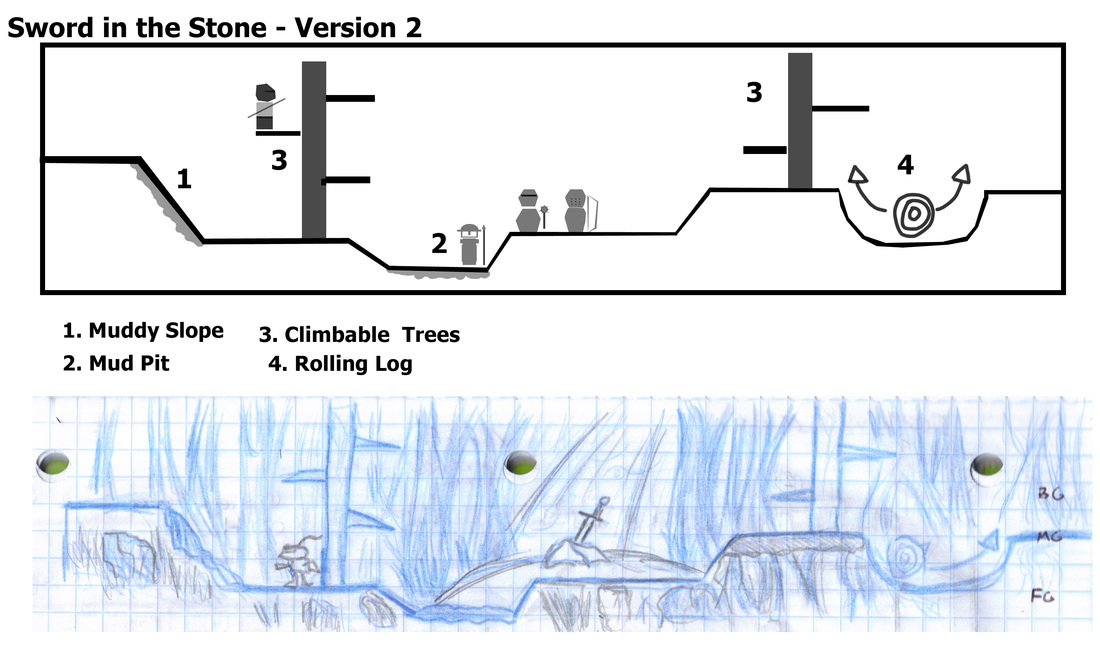
Sword in the Stone : Version 2
This version of the map is a bit more compact. I still wanted it to be simple but with the same variety. I still kept the rolling log in this version of the map but I made the area behind it much smaller. Combat is more focused toward the center of the map. I removed the destructible tree to accommodate for more space for the players to fight.
This version of the map is a bit more compact. I still wanted it to be simple but with the same variety. I still kept the rolling log in this version of the map but I made the area behind it much smaller. Combat is more focused toward the center of the map. I removed the destructible tree to accommodate for more space for the players to fight.
- The slope here is much steeper. This makes being the one of top of the hill more of an advantage. The tree is still nearby as to help players get to top of the hill.
- The pit is virtually the same as version 1. There is a slight change in its layout. The new layout is made to trap players in more but just like before the mud pit is easily avoidable.
- The trees in this layout serve the same function as they do in version 1.
- The rolling log is the same as the one from version 1.
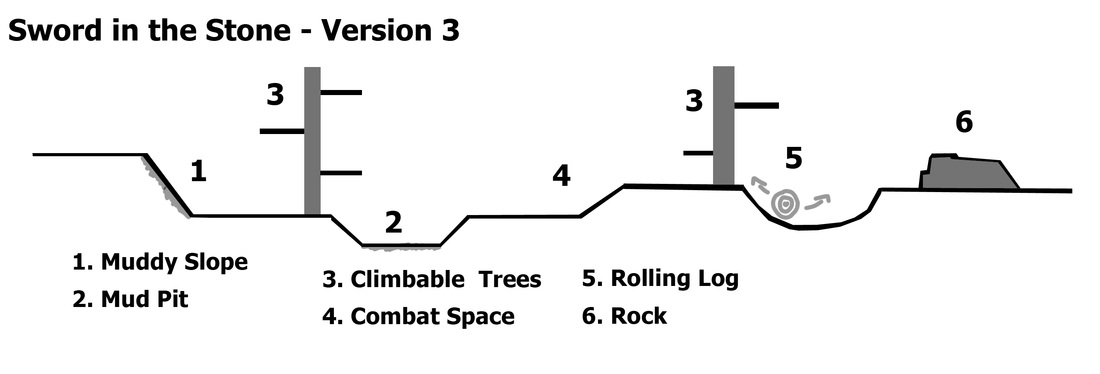
Sword in the Stone : Version 3
This version of the map is a bit more expanded out. I wanted to keep the mud pit at the center of the map but I didn’t want it to be the focus. I added some space around it allowing more areas for the players to meet and do battle. I also felt that the are to the right of the rolling log was kind of boring so I added a bit more space plus a rock that the players can jump on top of. Overall this incarnation of the map felt stronger.
This version of the map is a bit more expanded out. I wanted to keep the mud pit at the center of the map but I didn’t want it to be the focus. I added some space around it allowing more areas for the players to meet and do battle. I also felt that the are to the right of the rolling log was kind of boring so I added a bit more space plus a rock that the players can jump on top of. Overall this incarnation of the map felt stronger.
- Added more space to the top and bottom of the hill.
- Made the mud pit smaller and more even.
- Moved around just a bit but identical in it's original functionality.
- More room for the players to fight. I removed the destructible tree because I felt that it detracted from the action.
- Made the log smaller so players can avoid it easier. Log rolls back and forth a bit faster since it is smaller.
- Provides cover if you are standing underneath it. The top of the rock has some space to allow for combat.
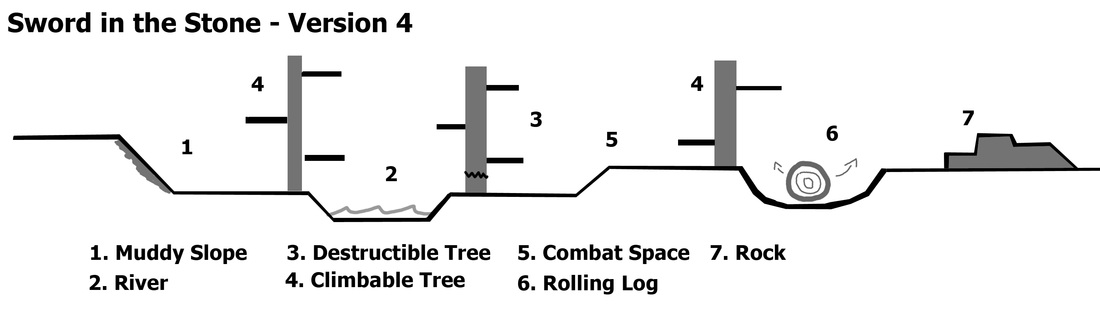
Sword in the Stone: Version 4
This is the final version of the map. I made a lot of changes but I also kept some things from version 3. First thing I did was I changed the mud pit to be a river that flows through the map. This varies things up visually making it more appealing and it introduces water as terrain type. Now players have two kinds of terrain to play with. They have Slippery(mud) and water(extinguish flames). I also brought the destructible tree back in. It can be destroyed in order to make a bridge over the river. I moved it so it isn’t in the way of the the main combat space. I also returned the rolling log to its original size and speed. The rock has been slightly modified to give the players more space to fight on and around.
This is the final version of the map. I made a lot of changes but I also kept some things from version 3. First thing I did was I changed the mud pit to be a river that flows through the map. This varies things up visually making it more appealing and it introduces water as terrain type. Now players have two kinds of terrain to play with. They have Slippery(mud) and water(extinguish flames). I also brought the destructible tree back in. It can be destroyed in order to make a bridge over the river. I moved it so it isn’t in the way of the the main combat space. I also returned the rolling log to its original size and speed. The rock has been slightly modified to give the players more space to fight on and around.
- Same as the previous versions.
- The river slows down players but it is small enough to be jumped over and isn’t a hindrance on the speed of the map. It doesn’t slow down combat.
- Teaches the player that some parts of the environment are destructible. It also serves the same purpose as before, creating a bridge when destroyed.
- Same as before but slightly moved around a bit to not be in the way of the player.
- Main area for players to do combat.
- Returned to its original size and speed.
- Modified to allow for better combat experiences.
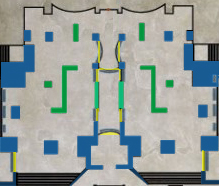
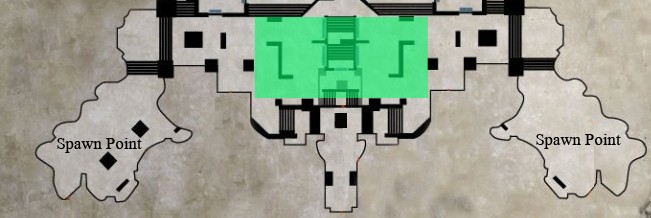
Level 2 - Castle Walls
What I wanted to do with this level was to build something that had more of a vertical flow to it. My focus was to make this level have lots of tiers that would have the player constantly moving up. What is interesting about this is that we can do so much with this idea. We can have the castle under siege as the players fight. We can have the level take place after a siege. There is so much we can do this level to change up the game play.
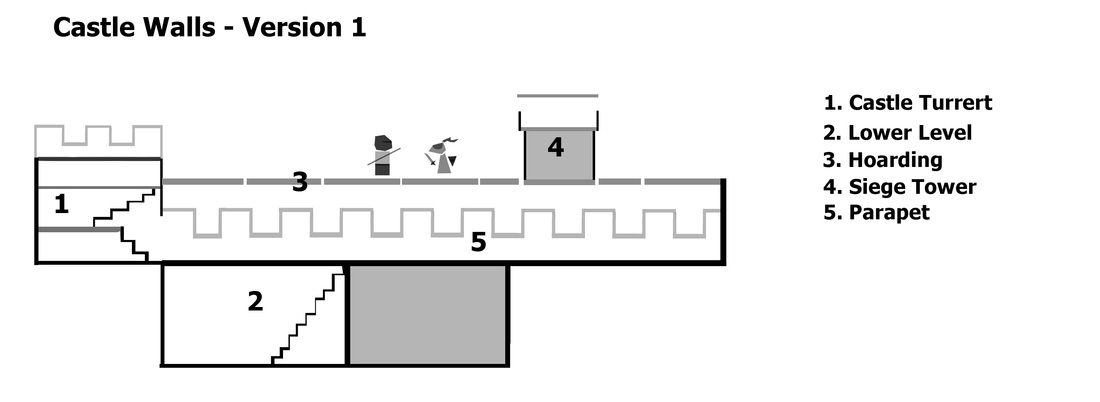
Castle: Version 1
This is my first pass at the map. I wanted to make it small but with lots of jumps. I feel that this design would keep the action constant. Players would be able to find one another easily but there are many escape routes. Just about every part of this map allows for ease of traversal down or up.
This is my first pass at the map. I wanted to make it small but with lots of jumps. I feel that this design would keep the action constant. Players would be able to find one another easily but there are many escape routes. Just about every part of this map allows for ease of traversal down or up.
- The idea here is to allow for players to come in and using the jump and double jump to easily scale the floors. They can do battle inside and on the roof. The roof will lead them out onto the hoarding. This keeps things flowing.
- This is the second floor where melee heavy players will want to stay.
- On a castle the hoarding is a wooden shield that protects the soldiers up on the parapets from arrows and projectiles. What I did here was add them above the parapets so that the players can use them to traverse the castle quicker and it gives players fighting on the parapets an option to escape. This also works if players are on top of the hoardings they can drop down to the parapets.
- I felt that just having the turret and the hoardings alone would leave the map a bit unbalanced. I placed the siege tower on the right side so players with ranged attacks can fight and have a vantage point. Since there are hoardings all around this allows for the melee based characters to reach these points and have a fair chance to fight back. This is balanced so that the lower part of the map is better for the melee based characters and the highest part of the map is good for the ranged characters.
- The parapets is the middle ground where most players will come in contact with one another. This serves as the main area where players can move up or down.
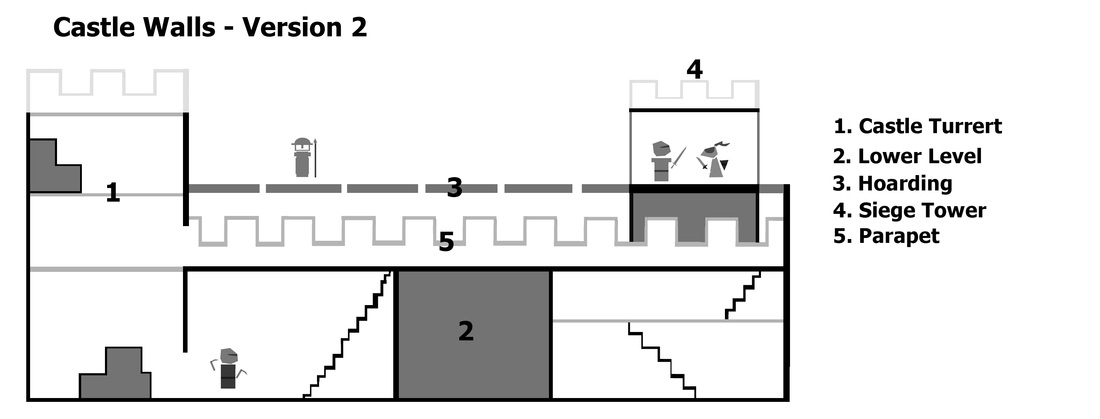
Castle : Version 2
What I did here was expand out the turret a bit and I also decided to add a room at the bottom so it gives the players another option for them. Before it was kind of a dead end with only one real exit route. This way the players can move into the bottom floor of the turret or exit through the stairs. I also added some crates in the turret so the player can easily jump to the next level. I moved the siege tower further to the right and made it a bit wider. Under the siege tower I added a few lower floors for more combat opportunities.
What I did here was expand out the turret a bit and I also decided to add a room at the bottom so it gives the players another option for them. Before it was kind of a dead end with only one real exit route. This way the players can move into the bottom floor of the turret or exit through the stairs. I also added some crates in the turret so the player can easily jump to the next level. I moved the siege tower further to the right and made it a bit wider. Under the siege tower I added a few lower floors for more combat opportunities.
- The turret has been expanded vertically and horizontally. This gives the players additional space to fight. There is now two doors. One on the parapet level and the second on the lower level.
- The lower level has been expanded on the right side.
- The hoarding functions the same as before but it is a bit more broken up so it is easier to read.
- Siege tower is more fleshed out. The players can climb to the top of the siege tower and in the center.
- The parapets are expanded to allow the players to transition between the different areas of the map easier.
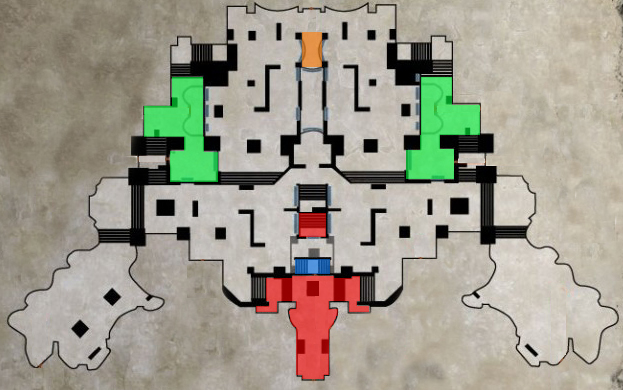
Level 3 - Dragon's Lair
This level is set right in the lair of the dragon. I was inspired by some great reference pics of caves in from the countryside of England. I had an idea of creating a level that would have radically different terrain compared to the other two levels. I wanted the key set piece in this level to be the dragon's lair. I want their to be a dragon that would come out of his cave and breathe fire on anyone standing in front of it's lair. This event would happen randomly on this map.

Dragon's Lair : Version 1
This map is set in the countryside. Outside this dragon's cave is a destroyed village. It is burned to the ground. All that remains is a ton of charred stones. The map leads into the cave which is dark and cold. Inside the cave is the dragon.
This map is set in the countryside. Outside this dragon's cave is a destroyed village. It is burned to the ground. All that remains is a ton of charred stones. The map leads into the cave which is dark and cold. Inside the cave is the dragon.
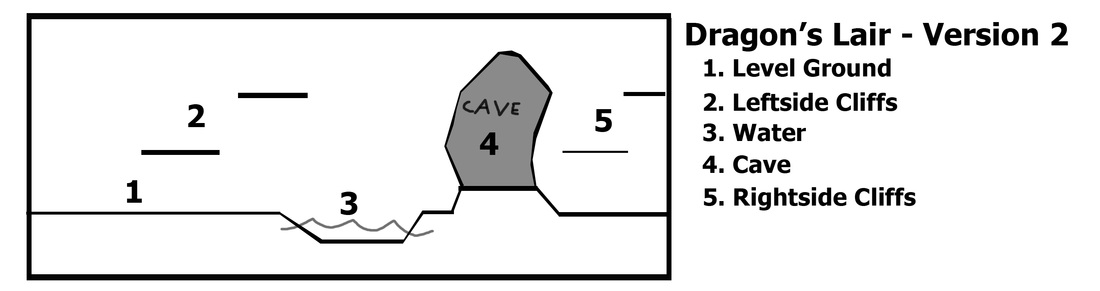
Dragon's Lair : Version 2
I decided to cut the village area out of the map and focus the map on the inside of the cave. I also decided that the cave shouldn’t just be the same old boring cave that is in the middle of the countryside or forest. I decided that visually a seaside cave is much more interesting.
Making the map smaller allowed for much more focused combat. I was also able to add some more jumps and things around the map. The first version lacked variety. This new design gives the players enough spaces to jump and fight. The dragon's cave is off to the right side of the map allowing players enough space to keep out of range of the dragon's deadly flame.
- This area allows for a good amount of combat.
- This I the first groups of rocks and cliffs on the inside of the cave that the player can utilize to jump over the water or to take a good vantage point with a bow and attack other players from a safe distance.
- The water here is low enough that it wont cause significant problems for the player but it will still slow them down. This pool of water can easily be cleared by a jump or dodge.
- The cave is situated on the right side of the map. The players can fight in front of the cave but in doing so they are vulnerable to the dragon's flames. The dragon will release its fire breath randomly. The cave can not be cleared vertically with a double jump but a well timed dodge can allow the player to get out of the way of the fire.
- The cliffs and rocks on this side allow for the ranged player to take position and land shots on their opponents.
Dragon's Lair : Version 3
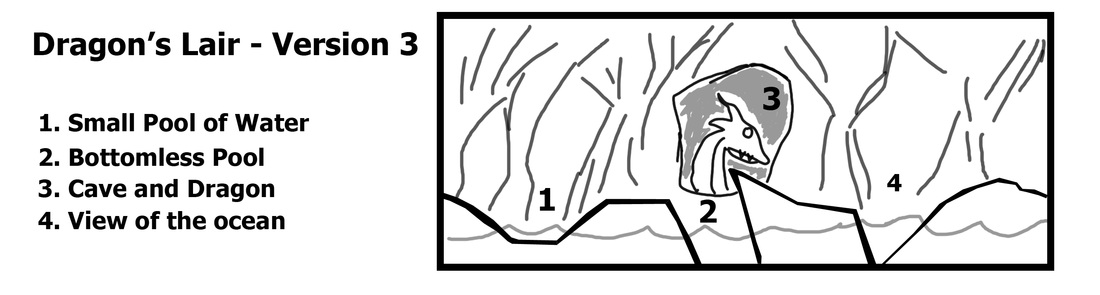
This version of the map focuses more on intense combat. I decided to make the map even smaller so there is no hiding from opponents here. I also added a few more hazards in this map. One wrong move and you can sink to your death. The real problem I found with this design is comparably more straightforward than previous versions.
This version of the map focuses more on intense combat. I decided to make the map even smaller so there is no hiding from opponents here. I also added a few more hazards in this map. One wrong move and you can sink to your death. The real problem I found with this design is comparably more straightforward than previous versions.
- This is just a small pool of water that will slow down players that are standing in it.
- This is a pool of water with no bottom. If the player were to fall in and not attempt they die. This is placed next to the dragon's lair in a way that if the player were to get hit by the dragon's fire they will either take the full amount of the damage or they can attempt to dodge it by jumping into the pit of water.
- The dragon and the cave are set further in the background.
- There is a steep part of the terrain which leads into a pool of water. This is an easy place for the player to get trapped.
Dragon's Lair : Version 4
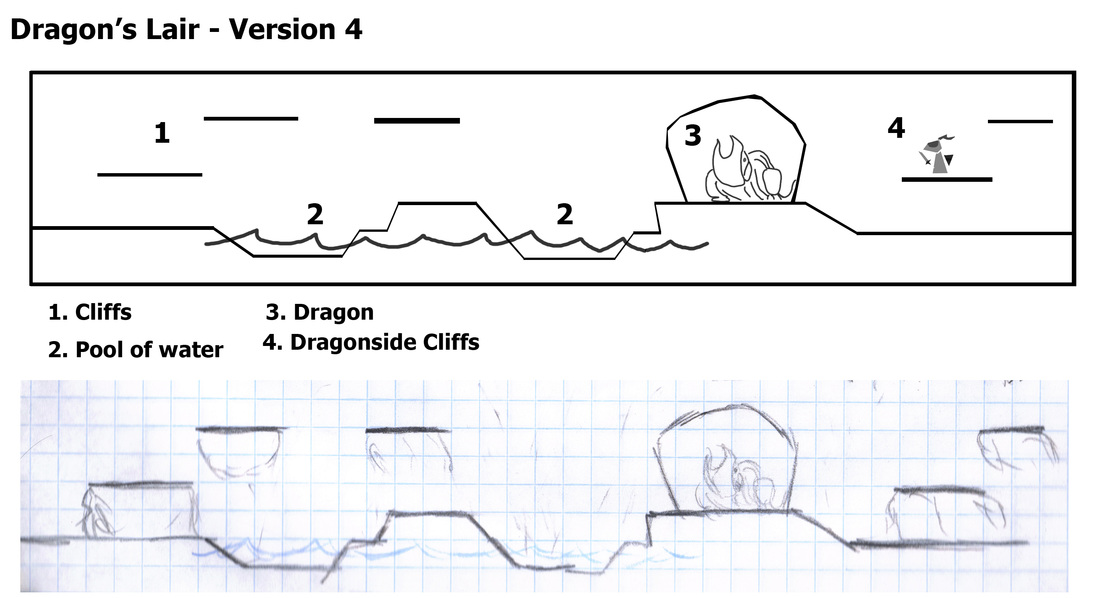
So after some tinkering I was able to come up with what felt like the perfect size for this map. I immediately removed the bottomless pool of water and varied the terrain up a bit so no type of character has any sort of advantage, thus making it more of a balanced map. I also made the cliffs easily accessible. I moved the dragon’s lair back to where it was originally. I also thought that maybe if we were to see the dragon it would add some sort of tension to the map.
So after some tinkering I was able to come up with what felt like the perfect size for this map. I immediately removed the bottomless pool of water and varied the terrain up a bit so no type of character has any sort of advantage, thus making it more of a balanced map. I also made the cliffs easily accessible. I moved the dragon’s lair back to where it was originally. I also thought that maybe if we were to see the dragon it would add some sort of tension to the map.
- The cliffs on this side of the map allow for interesting jumps and map traversal.
- Both pools of water are shallow enough for the player to jump out of with ease. They are also away from the dragon's lair ensuring that the player will not get stuck in the water.
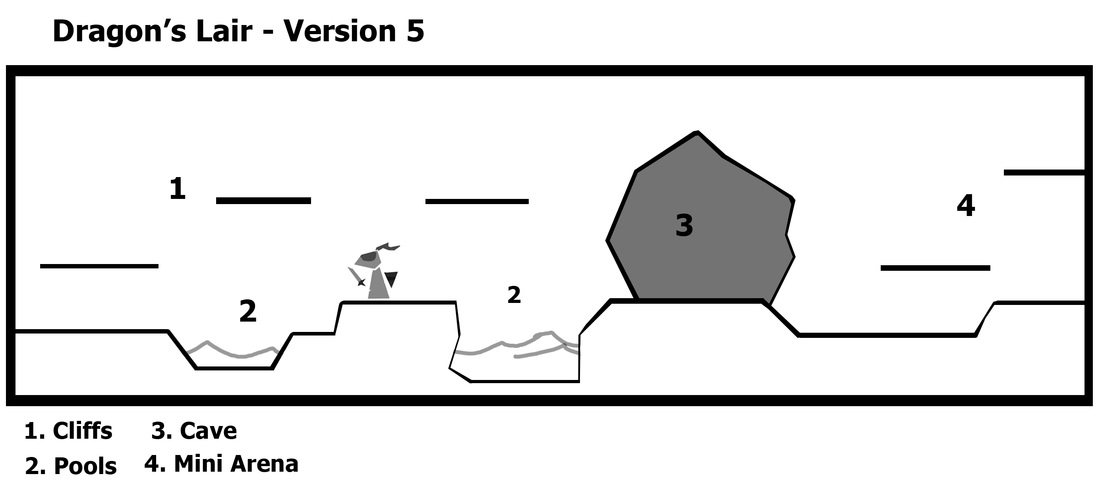
Dragon's Lair : Version 5
I took what I learned from version 4 and refined it. I made the first pool very easy to get out of and the second pool is a bit tougher but in no way is it a death trap. The dragons cave is wide but it also allows for a lot of combat outside of the cave. The cliffs on the left side stretch far enough that the player can double jump and dodge past the cave if they wanted to. The left side of the cave is opened up a lot more allowing for a variety of combat scenarios.
I took what I learned from version 4 and refined it. I made the first pool very easy to get out of and the second pool is a bit tougher but in no way is it a death trap. The dragons cave is wide but it also allows for a lot of combat outside of the cave. The cliffs on the left side stretch far enough that the player can double jump and dodge past the cave if they wanted to. The left side of the cave is opened up a lot more allowing for a variety of combat scenarios.
- Cliffs are a bit more open and stretch further across the map allowing for easier traversal.
- Pools of water are a small hazard but they are not fatal. Breaks up the terrain a bit and slows down the player.
- Dragon's cave is wider but now has more ways to avoid it. It also has a lot of room in front so there are opportunities for combat.
- This is the “mini arena” I call it this because I imagine that with this simple design it gives players a wide variety of places to attack from. Players can fight on the cliffs or do battle on the uneven terrain.
- Danny Q
@Dannylv100
@Dannylv100


 RSS Feed
