
Welcome to my latest blog post. I know it has been a while since my last post, please forgive me as things have been really busy for me on a few different levels. Luckily a lot of good things are in motion and hopefully I will be able to share them with everyone in the near future.
Something I have been working on recently is making physics assets inside of UDK. I have been working on making a rag doll for the characters of my current project (Formerly known as In Ruins). I also decided to go ahead and build all of the physics collision for the weapons.
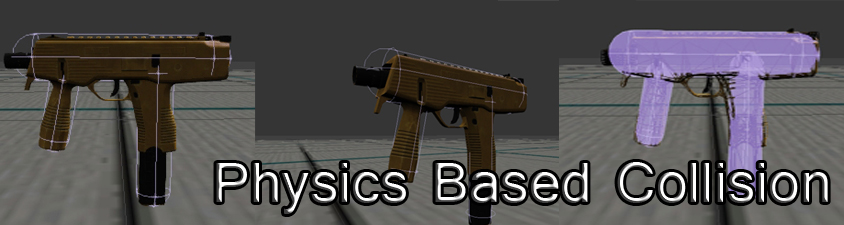
Giving weapons physics based collision will help them react realistically in your game world. In this tutorial I will go over how to build proper collision for your weapons and what collision works best and why.
Something I have been working on recently is making physics assets inside of UDK. I have been working on making a rag doll for the characters of my current project (Formerly known as In Ruins). I also decided to go ahead and build all of the physics collision for the weapons.
Giving weapons physics based collision will help them react realistically in your game world. In this tutorial I will go over how to build proper collision for your weapons and what collision works best and why.
Getting Started
The first thing I did after opening up UDK was to Fully Load my Weapons package. So make sure to fully load whatever package you have your weapon saved in (Example: My_Custom_Weapon).
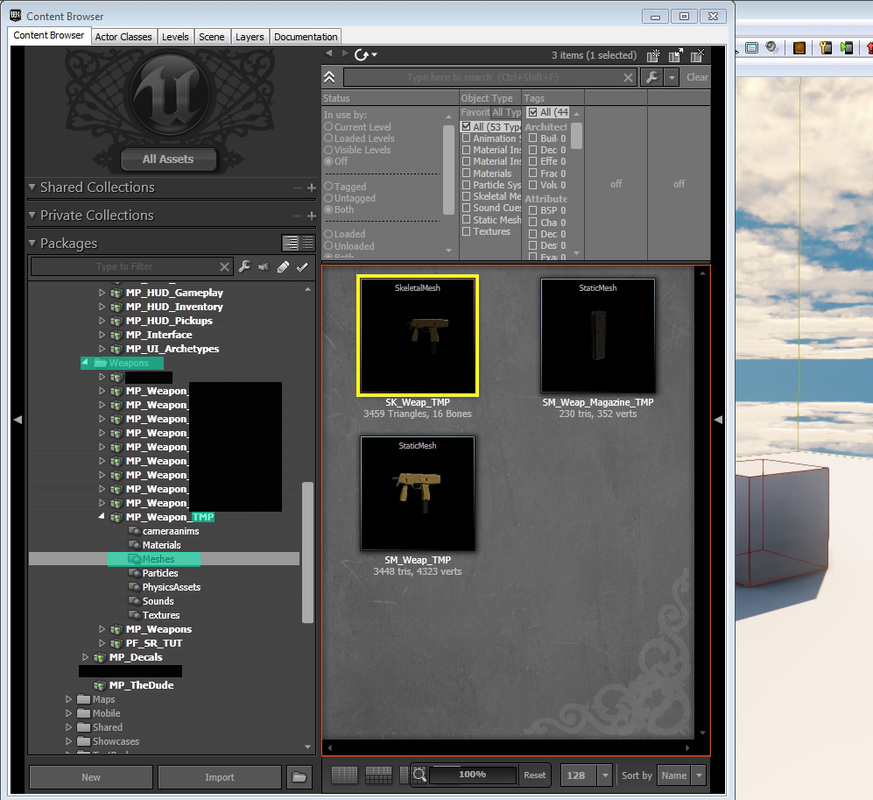
After that I open up the the MP_Weapon_TMP package and I select Meshes. Inside I see three things. I see the Skeletal mesh TMP, the Static Mesh TMP and the Static Mesh of the TMP magazine. Double click on the Skeletal mesh of your weapon so the skeletal mesh open up.
After that I open up the the MP_Weapon_TMP package and I select Meshes. Inside I see three things. I see the Skeletal mesh TMP, the Static Mesh TMP and the Static Mesh of the TMP magazine. Double click on the Skeletal mesh of your weapon so the skeletal mesh open up.
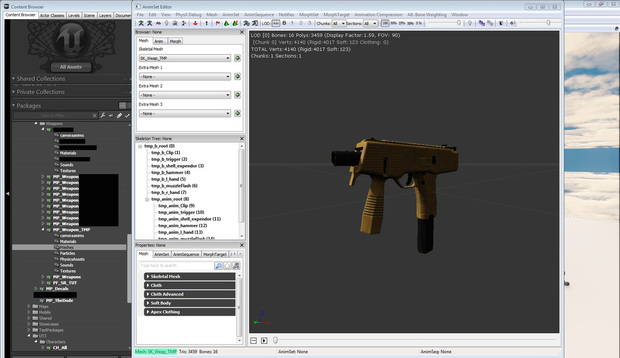
Your weapon requires 3 bones for this to work. Your gun should have b_gun_root, b_gun_lefthand and MuzzleFlashSocket.
After you've made sure you have these bones right click on your skeletal mesh and select the "Create New Physics Asset" option.
After you've made sure you have these bones right click on your skeletal mesh and select the "Create New Physics Asset" option.
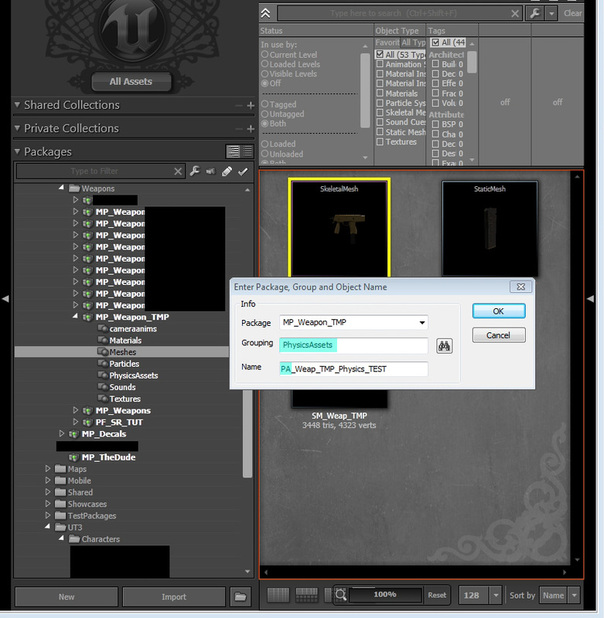
Once you clicked the "Create a New Physics Asset" option a dialog box will appear. It will ask you where to save the package and what group/name. For this I made sure to keep it with the rest of my TMP files so I did not change the package. For grouping add it to the Physics Assets folder, if you do not have one create one by typing in PhysicsAssets (all one word) or Physics_Assets.
As far as the name goes make sure to start it off with PA (for physics assets). Your name read as "PA_NameofYourCustomWeapon_Physics".
As far as the name goes make sure to start it off with PA (for physics assets). Your name read as "PA_NameofYourCustomWeapon_Physics".
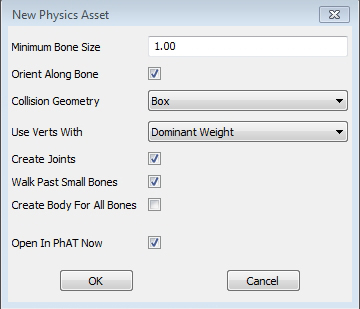
Just keep all this information set to it's default setting when building physics for weapons. You will have to change a few things for characters.
After you punch in the information another dialog box will appear. This one has a few options for your newly created physics asset. When creating a Physics Asset for a weapon such as the TMP all you need to do is leave everything set to default.
Once you're done reviewing this dialog box click "OK" to immediately open up the PhAT editor (Physics Assets Editor).
Once you're done reviewing this dialog box click "OK" to immediately open up the PhAT editor (Physics Assets Editor).
Inside the PhAT Editor
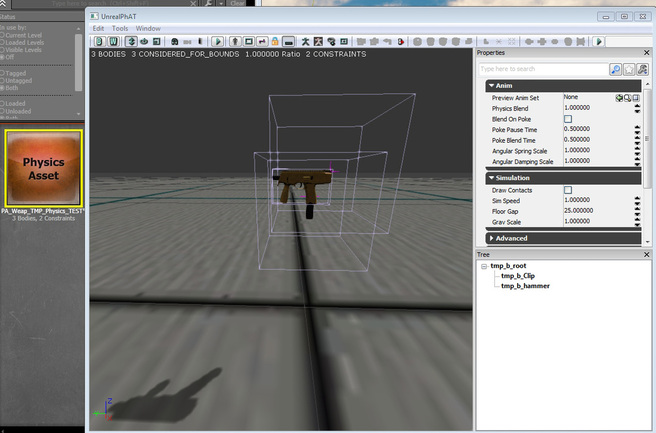
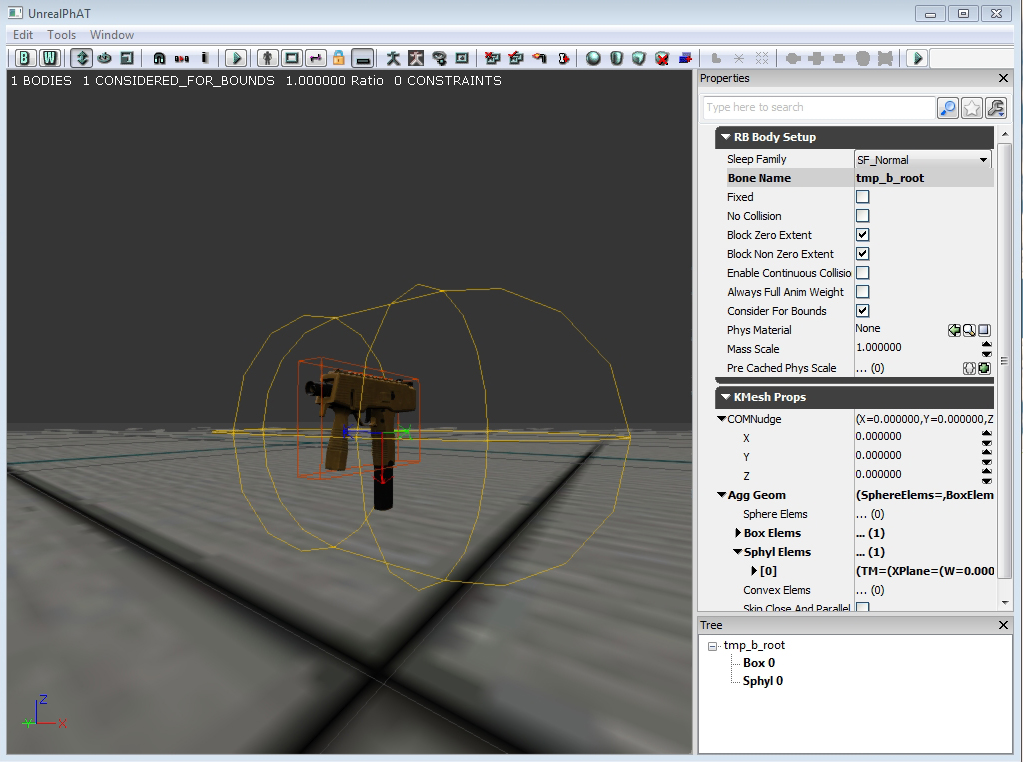
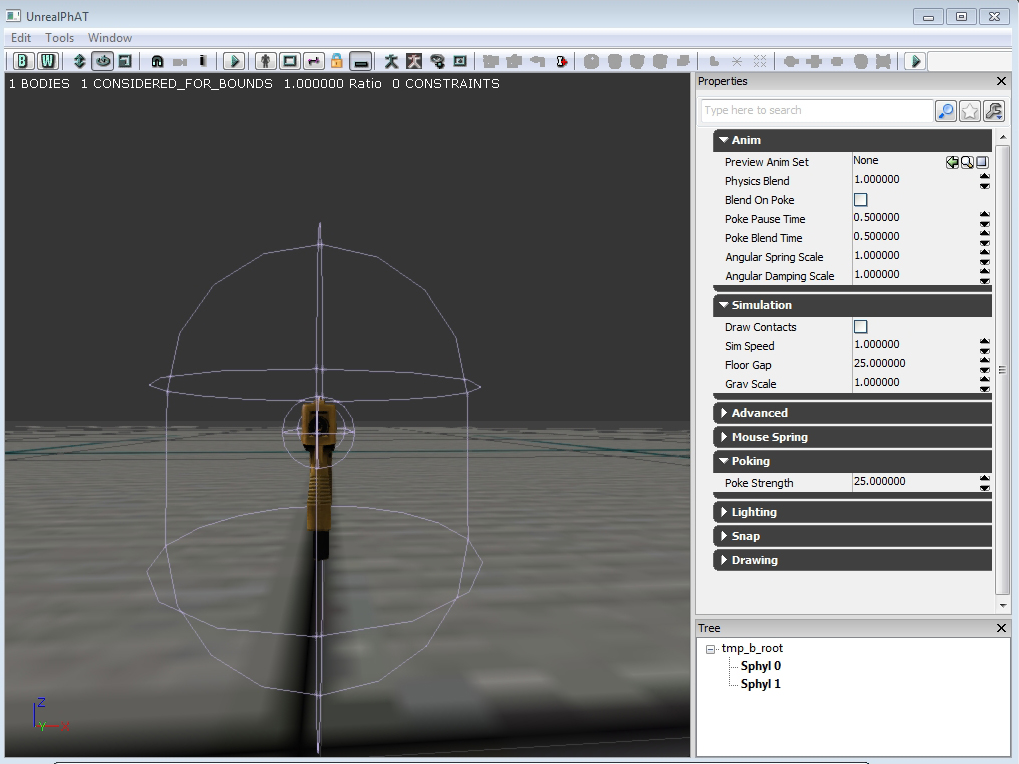
The PhAT editor should open up immediately and the first thing you should see is your weapon surrounded by a few wireframe boxes. These boxes are built onto the bones of your weapon. These boxes are the default physics collision of your weapon and for the most part you will need to delete them.
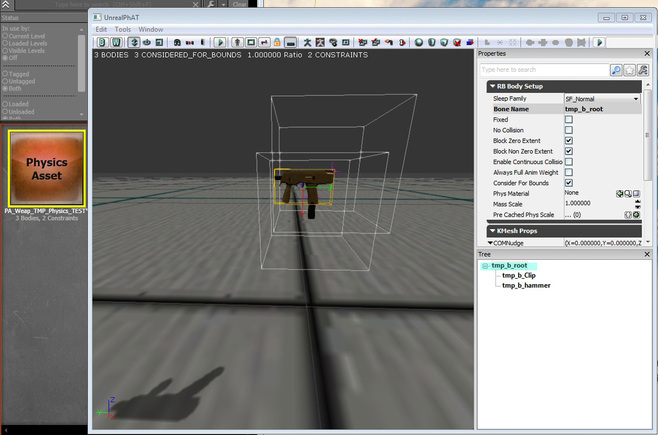
For my weapon the bone I want to use is the bone known as "tmp_b_root". This is my root bone and is the only bone that will give me the proper collision I want. The other two boxes will not properly interact in the world when we run a simulation.
If you're not sure what collision box is connected to your root bone, look to the right of your screen and click on the section that says "Tree".
If you're not sure what collision box is connected to your root bone, look to the right of your screen and click on the section that says "Tree".
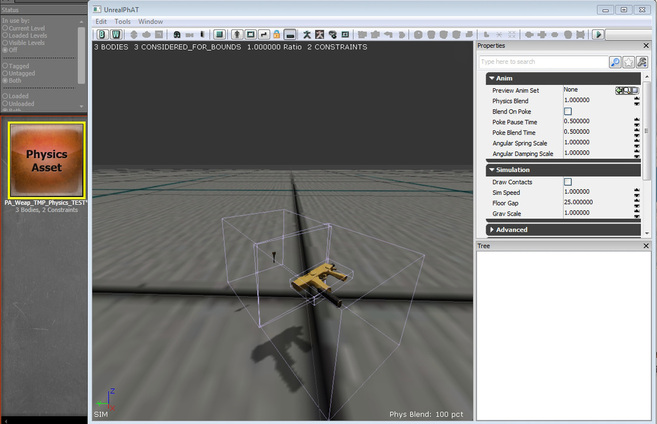
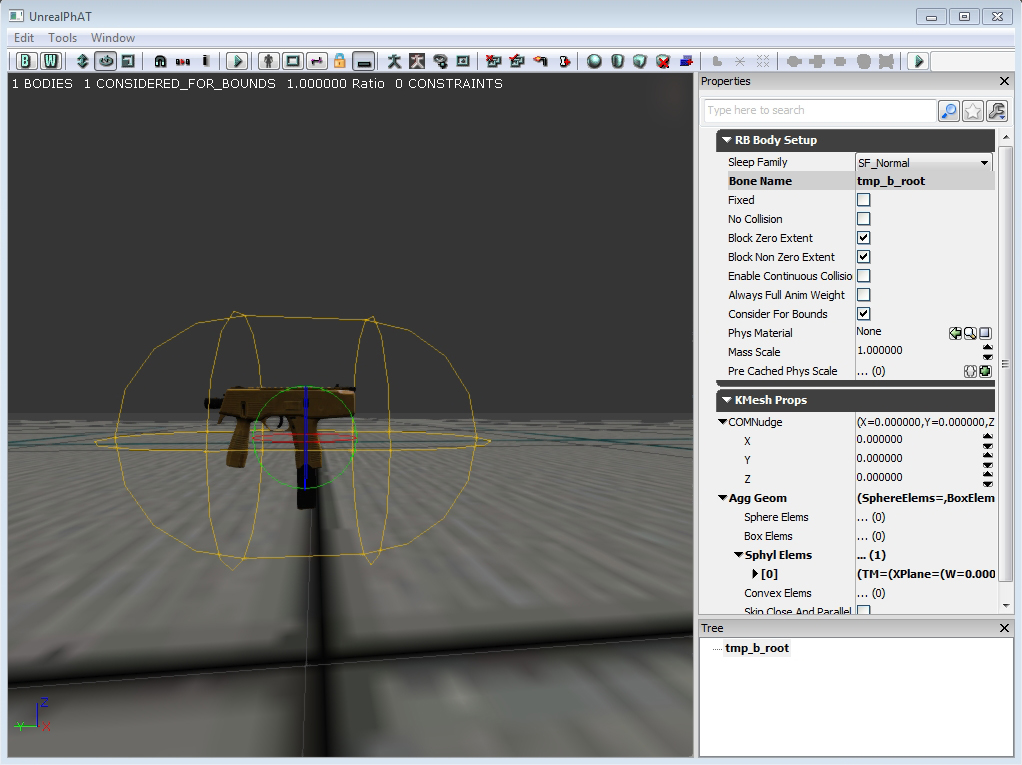
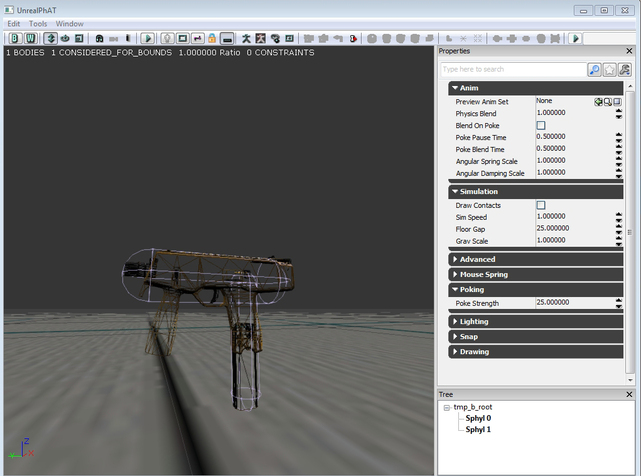
To run a simulation inside the PhAT editor press the "S" key on your keyboard. At the moment your weapon is bound to be flipping around and possibly the mesh may be breaking apart and getting stretched. This is because the collision is not set to the proper bone (In my case, the root bone). To end the simulation press "S" again.
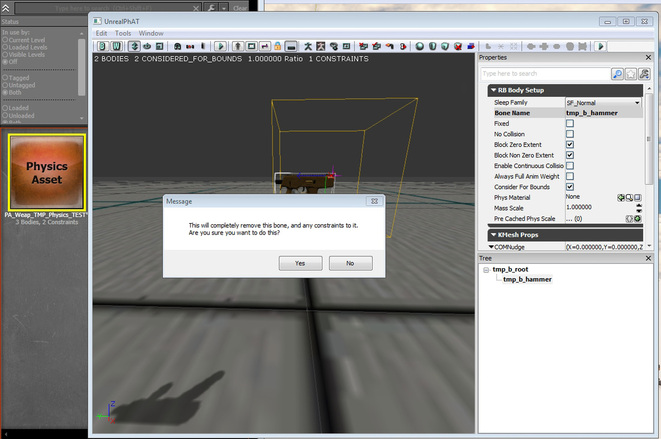
Start deleting the bones that are not your root bone. A dialog box will pop up, just click ok. As long as you are deleting the non essential collision boxes their shouldn't be any issues. The only remaining box should be attached to your root bone.
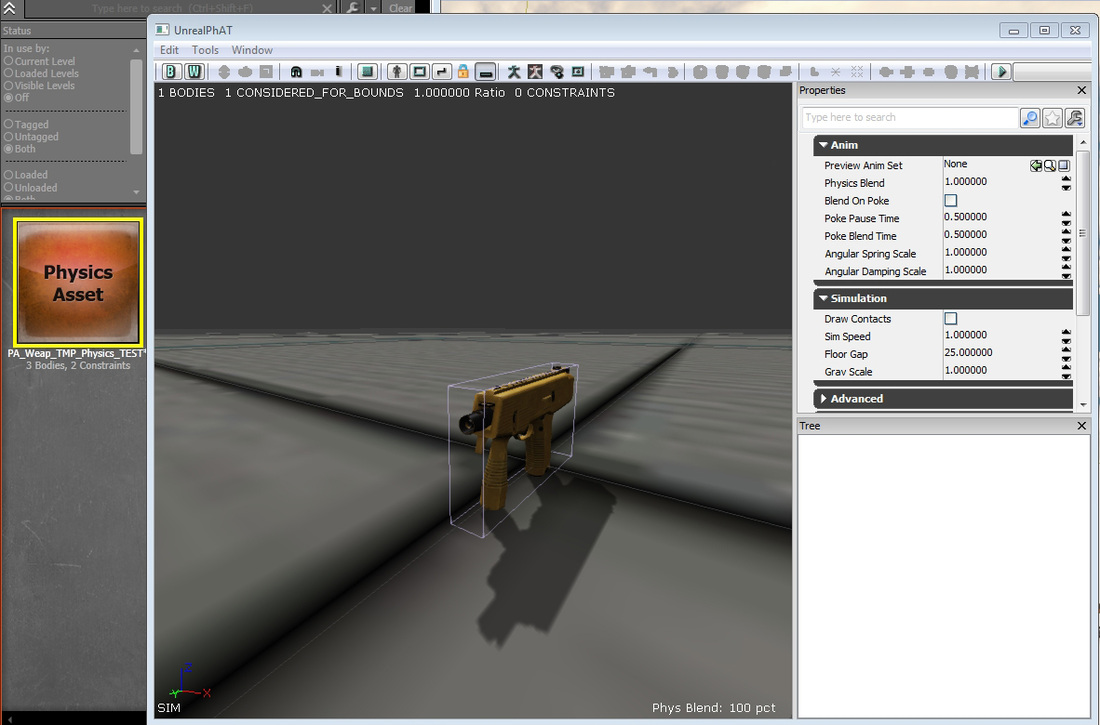
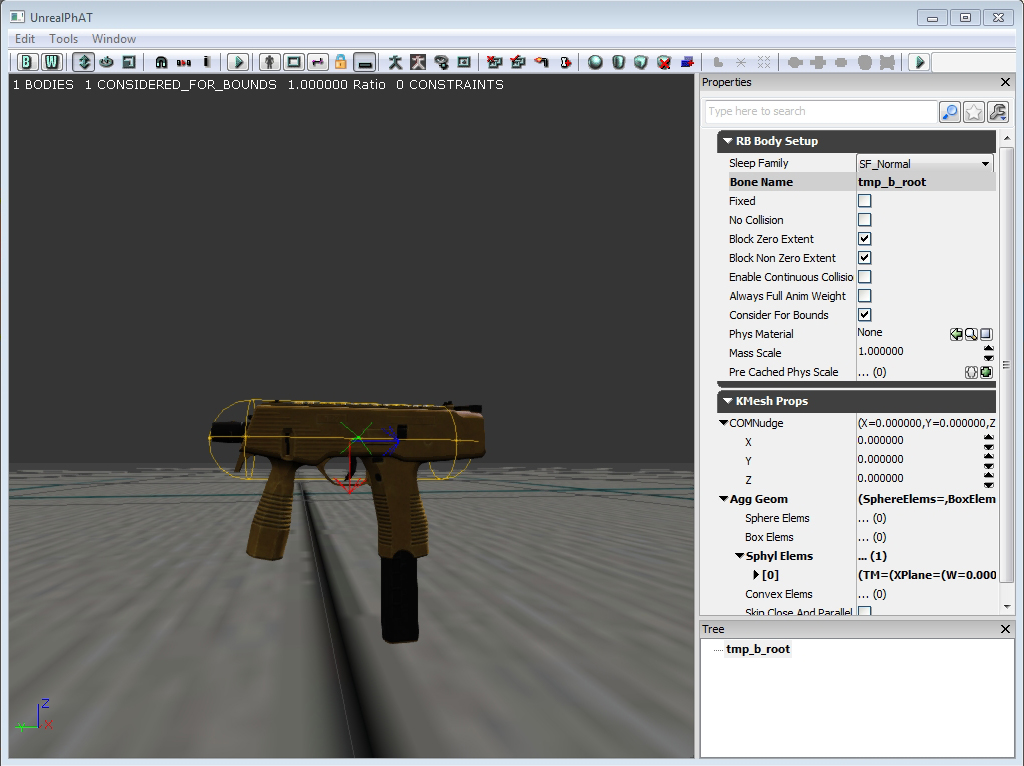
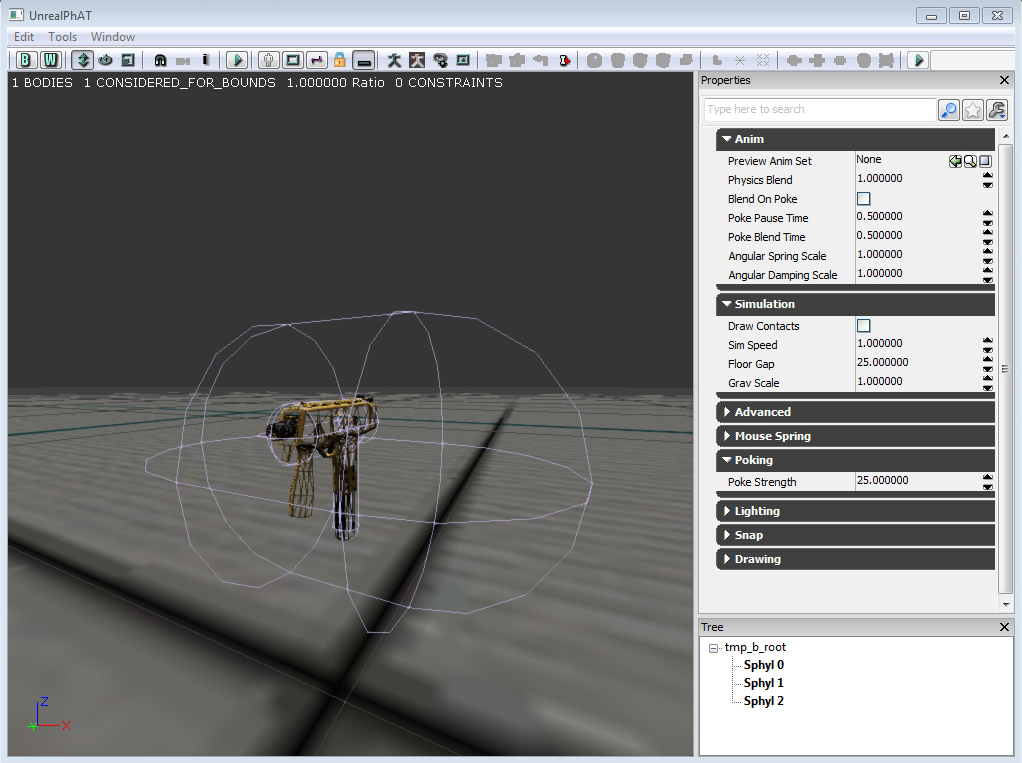
Run another simulation. The result should be your weapon falling down and colliding with the floor. If you get a result similar to the one picture above this means you are ready to start adding proper collision to your weapon.
Know your collision
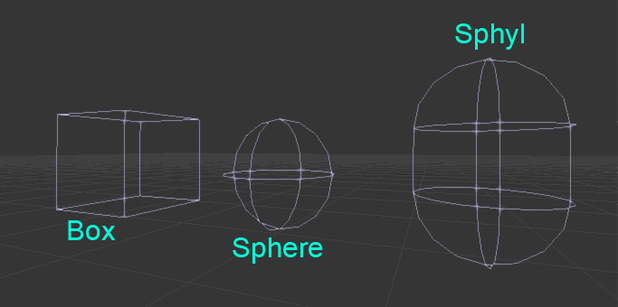
There are 3 types of collision primitives you can use to build physics collision for your weapon. You have the all purpose box, sphere and sphyl. I call the box all purpose because it can be used for just about anything, and it can be scaled into a rectangle. I do not recommend using the box for your custom weapon because the box is the most costly piece of collision to use.
The Sphyl is what you are going to want to use for majority of your collision. In my experience, spheres are best suited for characters and you probably wont be using them for any weapons.
The Sphyl is what you are going to want to use for majority of your collision. In my experience, spheres are best suited for characters and you probably wont be using them for any weapons.
Setting up Collision
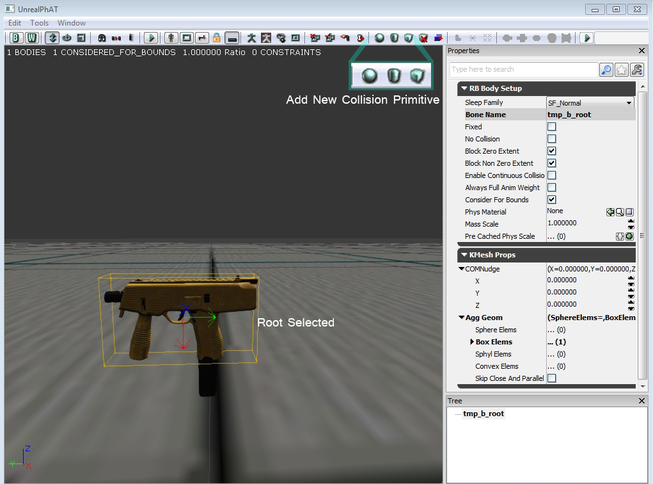
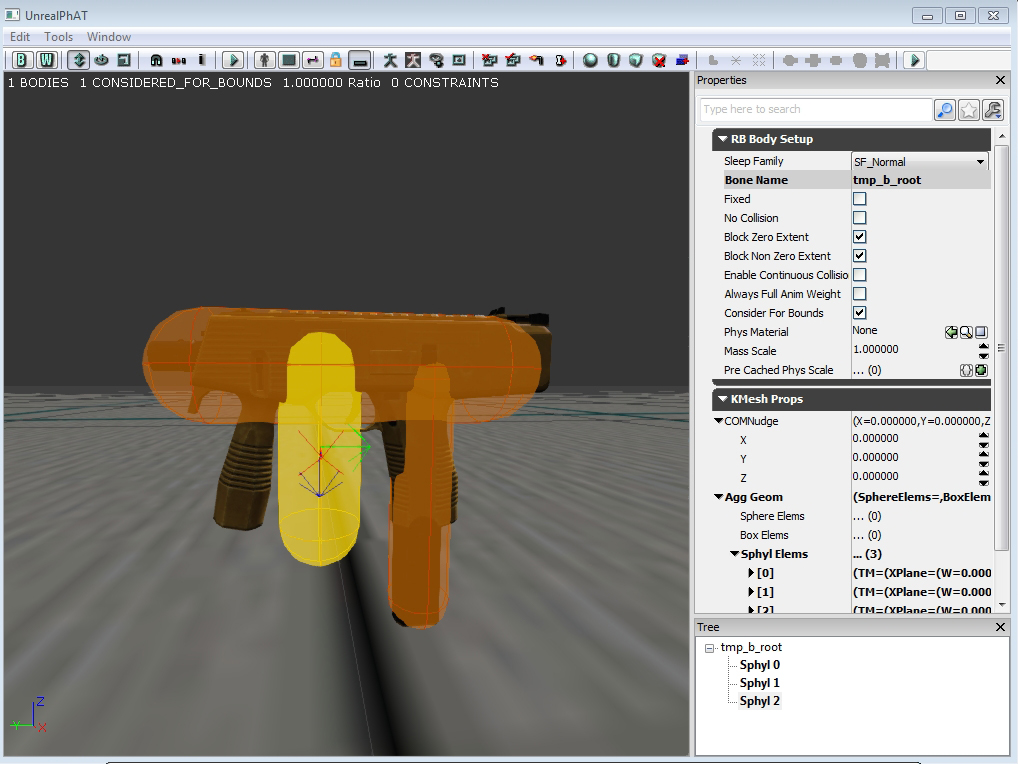
The next step is to select your root bone. You can tell it is selected because it will be highlighted a yellow color. You want to build your collision on this bone, so what you want to do is go to the menu bar atop the screen and select one of the new collision buttons. For the TMP I want to use a sphyl, so I will choose to add a new sphyl.

Now that I have my sphyl added in I need to get rid of the box. Just like before I will go ahead and select the box. Becareful, select the box directly by clicking on it or by selected "box" in your properties tree. Delete the box and and leave the sphyl behind as the only piece of collision.
I am going to use this sphyl as the top part of my TMP (The slide and barrel components). So what I am going to do now is scale it down with the "R" key. Going to pull the sphyl closer together until I get it to wrap around the the top portion of the TMP.
Now that I have the top portion of the TMP enclosed in collision I am going to click on the "Add new collsion..add sphyl" and add another sphly to my TMP.
The next step is to rotate it into position. Using the "E" key to rotate the sphyl and the "W" key to move it into position. I want to line it up with the weapons grip. I want this sphyl to vertically cover grip and give it proper collision.
The next step is to rotate it into position. Using the "E" key to rotate the sphyl and the "W" key to move it into position. I want to line it up with the weapons grip. I want this sphyl to vertically cover grip and give it proper collision.
Now that I have the sphyl scaled down and lined up with the grip I want to make sure it is lined up properly. To make sure everything is lined up I can alter the mesh rendering mode by pressing the "H" key. This will turn my mesh into a wireframe or turn it invisible so all I see is the collision.
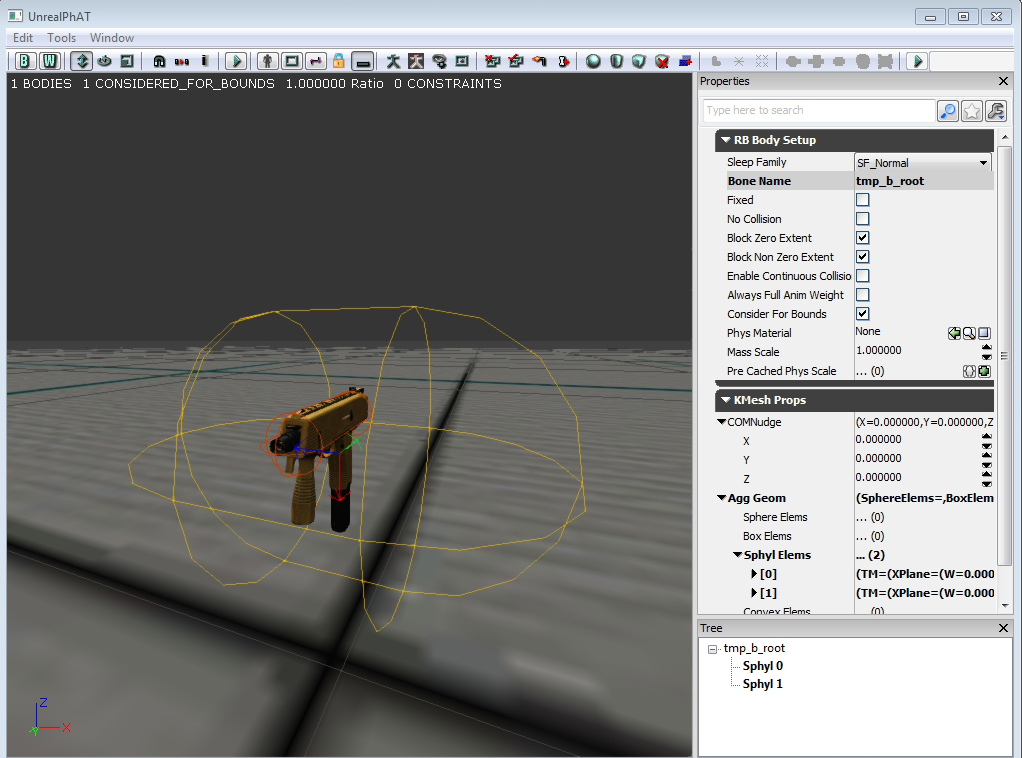
Everything looks lined up and ready to roll. I am going to add another sphyl for the fore grip and get ready for the final phase.
Everything looks lined up and ready to roll. I am going to add another sphyl for the fore grip and get ready for the final phase.
Just like before I rotate the sphyl and align it to the fore grip. This time around I want to check on the collision and make sure it isn't extending too far/wide. So What I am going to do now is press the "J" key and I can see the collision much better.
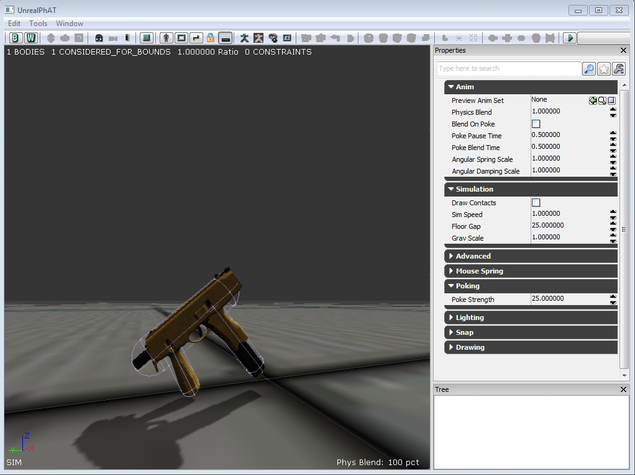
It is now time to run a simulation. As you can see from my screen the TMP is not colliding with the floor more accurately. You are going to want to tighten up the collision around your weapon. Not too tight though. You are going to want your weapon to be able to move around. If the collision is too accurate it might cause the weapon to behave awkwardly. You want to give your weapon enough leeway move around the environment.
Simulating Physics
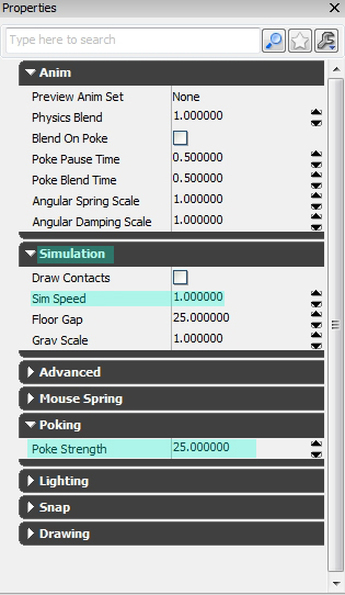
When you are running your simulation there are a few things you might want to mess around with. The first thing would be the sim speed. For my simulation, I generally kept it between .5 and 1.0, there wasn't any need to go any lower or higer.
The next thing you are going to mess around with is the "Poke Strength". When you're running a simulation you can "poke" your mesh. First you need to run the sim. Then during the simulation you can hold "Ctrl" and click on your mesh. This will give you an idea on how your mesh will react in game.
The next thing you are going to mess around with is the "Poke Strength". When you're running a simulation you can "poke" your mesh. First you need to run the sim. Then during the simulation you can hold "Ctrl" and click on your mesh. This will give you an idea on how your mesh will react in game.
The default poke strength is set to 100. For something as small as the TMP you will want to tone it down. I set mine at 25, enough power to get the TMP moving without sending it flying.
Conclusion
TMP - Physics Test (UDK) from Danny Quesada on Vimeo.
These are the steps I went through to give every weapon in the current build of the game. I hope this step by step guide was helpful to you.
- Danny Q
@Dannylv100
@Dannylv100


 RSS Feed
