dannylv100.com
  • Projects
    • Shrapnel
    • Flat Kingdom
    • Aero
    • Freeze-E Frosty's
  • Personal Projects
    • A Game In the Dark
    • Doom (2016) Design Test
    • 3rd Person Shooter
    • Forge Editor - Halo 5
  • Blog
  • Resume

Poppy's Playtime - Chapter 4 - Design Test

2/24/2025

 
Picture

   A little over a year ago I had the privilege of working on Mob Entertainment's Design test for Chapter 4 of Poppy's Playtime! The test consisted of two parts, the first was to create a 2D topdown of the level and the second half of the test consisted of building out a playable 3D blockout of the level.

3D Blockockout - Video Playthrough


Part 1: 2D Topdown

Picture

Part 2: 3D Graybox Blockout

Chapter 4-2: Intro

  Chapter 4-2 takes place roughly an hour into chapter 4. Doey and the player are escaping an abandoned prison and are attempting to reach Poppy. Along the way there will be booby traps that Doey has left behind to deal with any misfit toys.
Picture
Doey the Doughman as he appears Chapter 4.
Start of Level:​ After narrowly escaping from the prison, the player and Doey find themselves in a dilapidated laundry room. It has since been long abandoned, the floor has sunken in, leaving the two surrounded by debris and piles of rusting washing machines.

1. Start of Level: Laundry Room

Picture
Laundry Room - Starting Area.
   The player and Doey look around and see that they are surrounded by broken down stacks of washing machines. If they player searches the small pit they are trapped in, they will stumble upon a yellow VHS tape.

After they place the tape into the VCR, a TV in the corner of the laundromat will turn on and begin to show part of an episode of the smiling critters before the tape eventually warps and deteriorates.
​
  The light from the tv playing will highlight a SWING BAR. The player can grab onto the bar and pull themselves up and out of the pit. Once they are out of the pit, Doey will grab onto the bar and pull himself up to the player.
​

   As the player make their way back down into the destroyed room, they will be jump scared as MINI HUGGIES will begin to crawl out of the washing machines. The player can use their GRAB PACK to close the washing machine doors, to trap the huggies temporarily or push them away.

Note: The orange hand (Flaregun) can be used to defend yourself against the incoming enemies. 
​
  
   During this time, Doey will be able to grapple and absorb 2-3 enemies at a time, however the player need to find a way out before they are overwhelmed.
​
Picture
   The player will need to look around the stacked machines and find one that can be pulled forward into the pit (Purple puzzle piece). Once the machine has been found and pulled down, the player can use the SWING BAR to pull themselves out of the pit. Once they are out of the pit, Doey will follow them up and the remaining huggies will run and hide.
​  
Picture
The first Ollie call before leaving the laundry room.
   The rest of the laundry room is closed off with only one clear pathway out. As the players exit the Laundry room they will be called by Ollie (WALKIE A.).

   Ollie will tell the player that they can regroup with Poppy as she is just on the other side of the 
Incinerator Control Room exit door.

The player will make their way down to Path A. ​

2. Corridor Path A to T Junction

  The player walks down Path A to the T Junction. Ahead of the T-junction a door to Path B. There is also a hallway to the left of the T Junction that leads to the incinerator. 
​
Picture
From the laundry room to the T Junction corridor.
   The walkway to the incinerator room is partially collapsed, the player and Doey will have to use the SWING BAR to get across to the other side.
​

   Once they reach the door leading to the incinerator, the path will be blocked by steam. On the other side of the steam is a door lock that can ben unlocked via hand scan. If the player were to attempt to walk through, they will die. Doey can walk through the steam, he will be melted by the steam but will reform unharmed. Doey is unable to block the steam for the player as the steam will just go through him.
​
Picture
Doey approaches the Path B door, leading to the Boiler Room.
   As the player discovers that their path is blocked, Ollie (WALKIE B.) will call the player and inform them that they need to go down to the boiler room to remove the steam from blocking their path. Once the steam is gone, the player will be able to continue onto the incinerator room. 

   Ollie warns the player that the boiler room has been booby trapped by Doey. Ollie explains that Doey did so to prevent the other toys from messing with the boilers. However now you will now have to disarm the traps yourself.
​

3. Path B - Hallway to the Boiler Room

   Leaving the T junction and heading through the door, the player heads down a few set of stairs until they reach an obstacle. Just before the Boiler Room the player will run into TRAP #1. 
​
Picture
Path B to the Boiler Room.
   The first trap located just outside of the boiler room is a simple one. A large pressure pad in the middle of the hallway will drop a hammer down on anyone that steps on the pressure pad. ​
​
Path B - Trap#1 - Hammer The Player has to get Doey onto the pressure on the ground in order to bring the hammer trap down. Once the hammer is down, the player can jump onto the hammer to be taken into the ceiling.

​   Once they are in the ceiling, they will spot a battery that powers the trap. They can pull out the battery with their grab pack. With the trap deactivated, the player can then drop down from the ceiling and proceed to the Boiler Room. 
   Before entering the Boiler Room, Ollie will give the player a call (Ollie Call C) over the walkie talkie. Ollie will tell the player that the boiler room is filled with traps set up by Doey in order to prevent the other toys from messing with the factory. 

4. Boiler Room

   The boiler room is dark, dimly lit with tight winding corridors. There are three sets of boilers that the player will need to find. Each boiler will have a trap nearby that must be deactivated before they can access the pressure valve. Each Valve (represented by the purple puzzle piece) will need to be adjusted by the player in order to remove the steam that is blocking their path to the incinerator.
​
Picture
   There are no enemies in the boiler room initially, but after 2/3 of the traps have been deactivated the traps, they will hear nearby vents open up followed by the barks of two PJ Pug-a-Pillar. They will enter from opposite ends of the boiler room to patrol the tight corridors in pursuit of the player.​ 

Enemies Present: PJ Pug-a-Pillar

   If a Pug catches the player, it is game over. However, if the player is with Doey when attacked by an enemy, Doey will grapple the enemy pug, preventing it from attacking/killing the player. He can only grapple one at a time. Doey can't absorb them as he can with smaller enemies, but his grapple will keep them occupied, giving the player time to escape.
​
Picture
PJ Pug-a-Pillar in Chapter 3.
   After being grappled for a few seconds, the pug will break free and then begin patrolling again. They don't see Doey as a target and therefore will only pursue the player. Doey will spring into action if he witnesses a pug chasing a player.​
​​
   If the player is chased and Doey can't help or isn't near, they can escape by sprinting away and breaking line of sight. After a few seconds of being out of view, the Pug will give up the chase and resume patrolling the boiler room.

Boiler Room Trap #1 - Electrified Water

   Player needs to get Doey to walk into an electrified moat that surrounds the gate to the boilers. Once Doey is inside the moat, the player will need to use their grab pack to place their hand on a nearby battery that is secured to the wall (welded in place and can't be moved).

​   The player will then use their second hand to grab Doey, who is conducting electricity from the moat. This will result in the battery in the wall overloading, deactivating the trap. 
​​ 
Picture
Trap #2.

Boiler Room Trap #2 – Around the Corner 

   In order to deactivate trap #3, the player must get Doey to hold onto the bars and head down the hall and around the corner. Once around the corner, the player will find an electrical wall outlet. They can grab the wall outlet and move back toward the boiler, but they won't have enough slack to reach Doey.
​
Picture
Trap #3.
  The player will need to grab a nearby metal pipe (same kind used for puzzles) that hangs off of a nearby wall. The player will need to be holding the outlet, and the metal pipe, Doey will then stretch his hand over to the pipe, causing it to spark violently as the batteries powering the gate overload and explode.
​

Boiler Room Trap #3 – Heavy Gate 

   The gauges are protected by heavy electrified gates. Doey can walk through the bars of the gate but the player can't bump into the bars without dying/taking damage. They can use the grab pack to hold onto the the bars which will charge up their grab pack hand.
​
Picture
Trap #4.
   The player will now have to use their electrified hand  (green hand) to activate nearby switches). The player will have to charge up for each switch. 

  One of the switches is nearby, the other is down a corridor and the final switch is on ceiling. After activating all 3, the trap will be deactivated and the gate will open, granting the player access to the pressure gauge on the boiler. 
​
Boiler Room - Pressure Puzzle: Once all the traps are deactivated, the player will need to ensure that every pressure valve is balanced​. They will need to interact with each pressure valve and release pressure until each and every gauge is equal.
​
Picture
Escaping a pursuing PJ Pug-a-pillar.
   Once the pressure is balanced, the player will receive a call from Ollie who will let them know they can now head over to t he incinerator.  As the player and Doey exit, they lock the door to the boiler room behind them, locking them pugs inside so they can't pursue the player.

5. Incinerator – Boss

   After receiving Ollie's call, the player will need to backtrack to the T junction and swing across to the incinerator door. Now that the steam is gone the player can now use the door's hand scanner to open to door.
​

Picture
Incinerator Boss Area and Control Room Exit.
   The player and Doey enter a small room that overlooks a trash pit. To their left they will spot a walk way. They will attempt to walk across and everything will be fun until they reach the middle. 
   Once they have reached the middle of the walk way, a cut scene will activate with the incinerator roaring to life, the room turns bright red as fire erupts from the mouth of the now living incinerator.

   As the player and Doey try to get away, the walkway collapses sending them plummeting into the piles of trash/debris below.

Boss Fight Begin

   From the garbage chutes (trash can icon) enemies (ruined critters) will be dropped into the arena at regular intervals in groups of 3-5. Doey can defeat 2-3 at a time, which means players will have to remain vigilant as they will need to be dodging enemies and the boss's claw attacks (claw icon). The player can use their flares (orange hand) to scare off the critters but they will be reliant on Doey to actually eliminate them.
   If the player or Doey is grabbed by the claws, they will be lifted up and carried to the mouth of the incinerator. If either of them are dropped into the incinerator it is game over.

   The player can use their grab pack to pull the emergency release on the side of the claw, this will cause the claw to open up and drop whatever it is carrying. Players can also do this to cause the incinerator to drop heavy objects onto enemies below. 
​
How to beat the Boss: After a few minutes of dodging, the player will hear a platform enter the arena on a track near the boss's claws. The player will have to use their grab pack to move and/or shake the cargo platform, causing it to drop explosive barrels into the incinerator.

 They can drop the explosive barrels directly in the incinerator's mouth or trick the boss intro picking up a barrel. Each successful drop will result in a fiery explosion that may knock the player back as well as the platform above. The player will have to repeat this process up to three times in order to defeat the boss.

6. Incinerator – Control Room/Level Exit

   Ollie will call the player and tell them that they are right next to the exit, they just need to find a way out of the incinerator pit.
​   The player can look around the room and if they were to look at the ceiling, they will notice a platform hanging from the ceiling. Using their grab pack, they can reel the platform (claw icon) down. Doey and the player hope onto the platform, it carries them into the air. The player will then use their grab pack to grab a bar above the control room and reel themselves toward it, allowing them to jump onto the walking way leading into the control room.
​

   Once doey and the player reach the control room, they will get another call by Ollie. Ollie will be glad to hear that the player and doey are safe. Ollie will tell the player that Poppy is on the other side of the control room, down Path C.
​
  The players will leave the office via Path C can make their way to the end of the hall, they will notice that the stairs leading up to the exit are destroyed. Luckily, doey can transform into a trampoline and bounce the player up to the level exit to finish Chapter 4-2. ​

Special thanks to the team at Mob Entertainment for allowing me to share my deign test!

Home
Projects
Resume

- @Dannylv100

Gameplay/Level Design Highlights! - SHRAPNEL (Unreal Engine 5)

8/7/2024


   This video features gameplay in and around Chiodo Facilities and Golden Odori, which are two of the 6 areas of the map I directly worked on!

- Dannylv100

Yomi Map Tour video now live!

4/5/2024


Map Tour - Yomi


- Dannylv100

SHRAPNEL - Stx. 1is LIVE! -  Gameplay

2/8/2024

 
Picture
  SHRAPNEL Stx.1 is live ! Check out some gameplay footage from a fan channel! I chose a video that featured many of the areas of the map I worked on! You can find more gameplay videos uploaded on the fan's channel!

Stx.1 - 2/08/24

UPDATE: Stx.1 - 2/11/24

Here is another video from after the launch. 

- @Dannylv100

Doom (2016) - Design Test - Behind the Scenes

1/28/2023


Introduction:

  Hello! I can finally share some more of the work I did for the Doom (2016) design test. The work below will be a few slides showcasing the sequence of events as well as the documentation that was sent along as part of the test. 
  For the test, I made a quick top down sketch of the general layout. I then took it into photoshop and made a cleaned up version of the sketch and used it as the basis of my 3D block out.

   For the 3D blockout, I used Unreal Engine 4. I originally planned on use the level editor built inside of Doom (2016), but the directions for the test specified to block it out in UE4. 

Turbine - Doom(2016)  - Sequence of Events (Documentation)

1. Mission Start – A way Out?

- The mission begins with the player heading down a corridor leading to a tram terminal. The facility they are in is locked down. The player reaches the terminal only to find it out of offline. The entire facility is on back up power and the power can't be rerouted to the tram from this location. There is no way out of this part of the facility unless it is on rails.​​
​
Picture
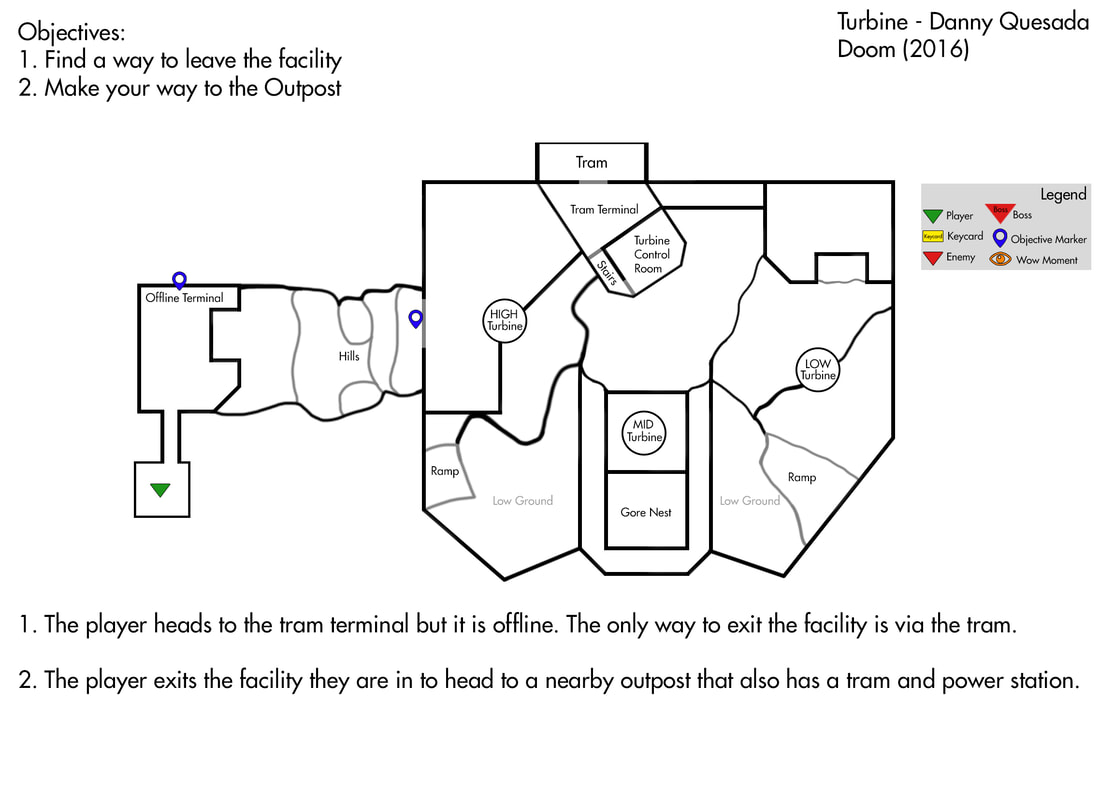
1/6
- Checking the nearby monitors, the player discovers that there is an outpost with it's own tram terminal nearby. The player will need to leave the building and head toward the Mars surface so they can reach the outpost.

- The player travels a short distance, climbing up a rocky hill until they reach a cliff overlooking the outpost.

2. UAC Building (Tram Terminal/Turbine Control Room)

Note: The player is free to wander around the outpost before reaching the objective. There will be enemies patrolling around the outpost that can be alerted to the player. If the player doesn't alert them, they will join the fight later.

- The player looks down into the valley. There are 3 large wind turbines (HIGH, MID, LOW) swaying in the wind. Their blades spin fruitlessly as possessed scientist wander about. The view of this power outpost in the middle of this windy valley is a wow moment.

- To their left of the player is a UAC building (the terminal/turbine control room). There are a few blinking lights outside the building, blinking in a way to indicate that there is still some power on.

- The player jumps down from the hill, landing hard for a moment. They walk past the first turbine and make their way to UAC building. If the player were to look at the computer monitor on any of the turbines, it will read “Turbine Offline”. There is a few possessed scientist walking near the turbine, but they are easily dispatched.
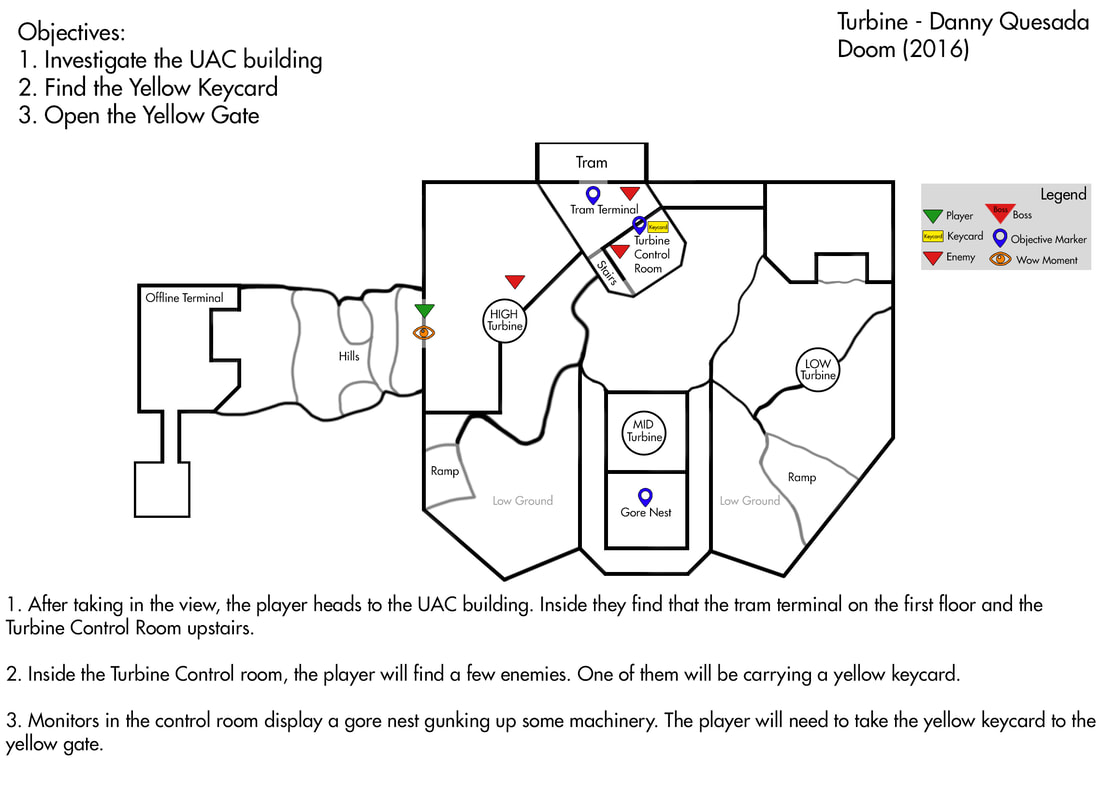
​
Picture
2/6
​- The player reaches the UAC building. On the first floor of the control room the player will come across a few more basic enemies (possessed scientist, solider and security) on patrol.

- The tram terminal on the first floor is inaccessible due to lacking power. Luckily for the player, the turbine control room is just up the stairs.
​
Picture

​- The player will make their way upstairs to Turbine Control room. Inside this room there will be 4 possessed scientist, a Security enemy and a soldier enemy. One of the possessed scientist will have a yellow key card on them.
​​
Picture
Yellow Keycard held by an enemy.
- After the player dispatches the enemies, they can check the computer monitor. On the monitor there is an image of a Gore Nest sitting on top of an important mechanism for the turbines. The mechanism has overheated, causing the turbines to power off.

- The facility has just enough power to stay on for a bit longer, but if the player doesn't get the turbines back online, there will be no way for the player to leave this area, trapping them.

Note: This information can be conveyed to the player via on screen displays or a voice over narration.

- In order to generate enough power for the tram, the player needs to get the turbines working again, which means they need to take the yellow key card to the gate, destroy the gore nest and then realign the three turbines.  ​

3. Opening the Yellow gate / Destroying the Gore Nest

- With the yellow key card in hand, the player needs to head toward the MID turbine. Underneath the mid turbine is the yellow gate. Depending on which way they head, the player may run into a few different enemy patrols. Imps, Possessed Engineers/Scientist and Hell Razers patrol the areas nearby.
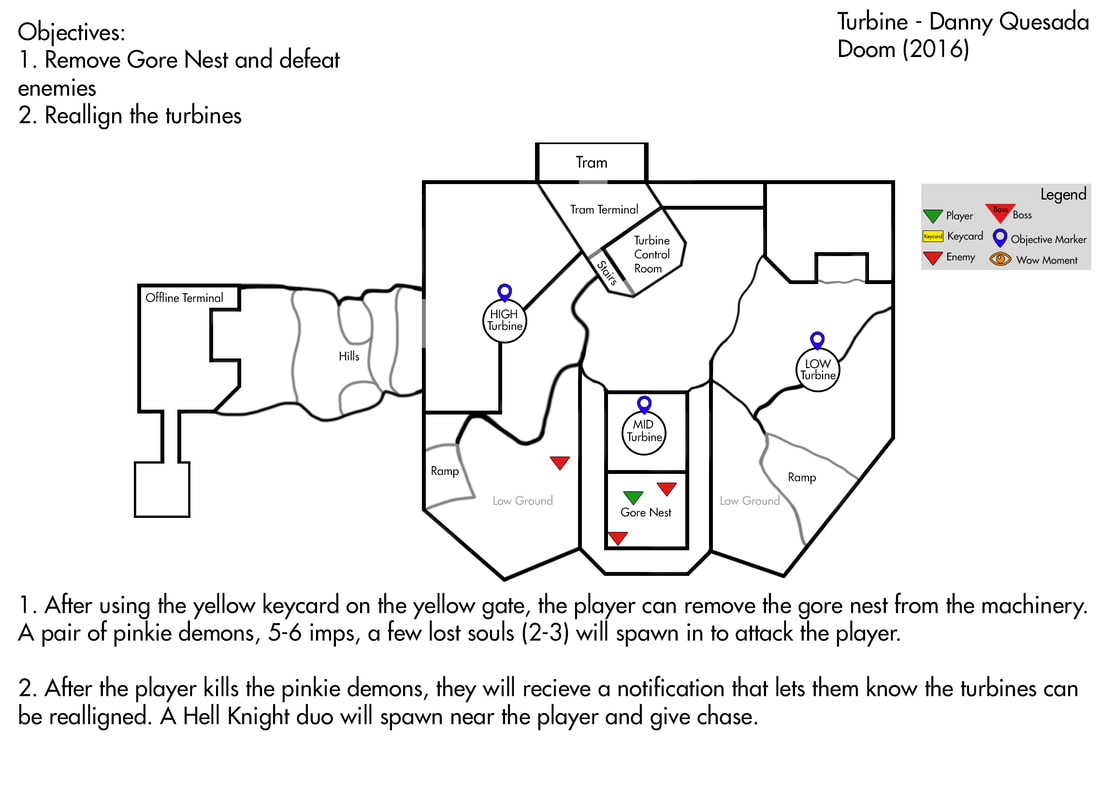
Picture
3/6
- The player opens the gate and removes the gore nest, resulting in a wave of enemies spawning nearby. A pair of pinkie demons spawn on the ground level, 5-6 imps spawn on the nearby structures, raining down fire balls as a few lost souls join in from the valley.

​- After the Pinkie demons have been killed a pair of Hell Knights will spawn and pursue the player.​
​
Picture
Destroying a Gore Nest.

4. Realigning the Turbines

- With the Gore nest removed the turbines will be functional again. The player will need to make their way to each turbine and interact with their respective computer monitor in order to realign them and start generating electricity to power on the tram.

- The player can realign the turbines in any order they choose.

Note: The last turbine to be powered on will spawn a Baron of Hell (Boss) that will need to be defeated before they can complete the mission.

- Upon activating the computer on the turbine, a wave of enemies will spawn in to attack the player.


Picture
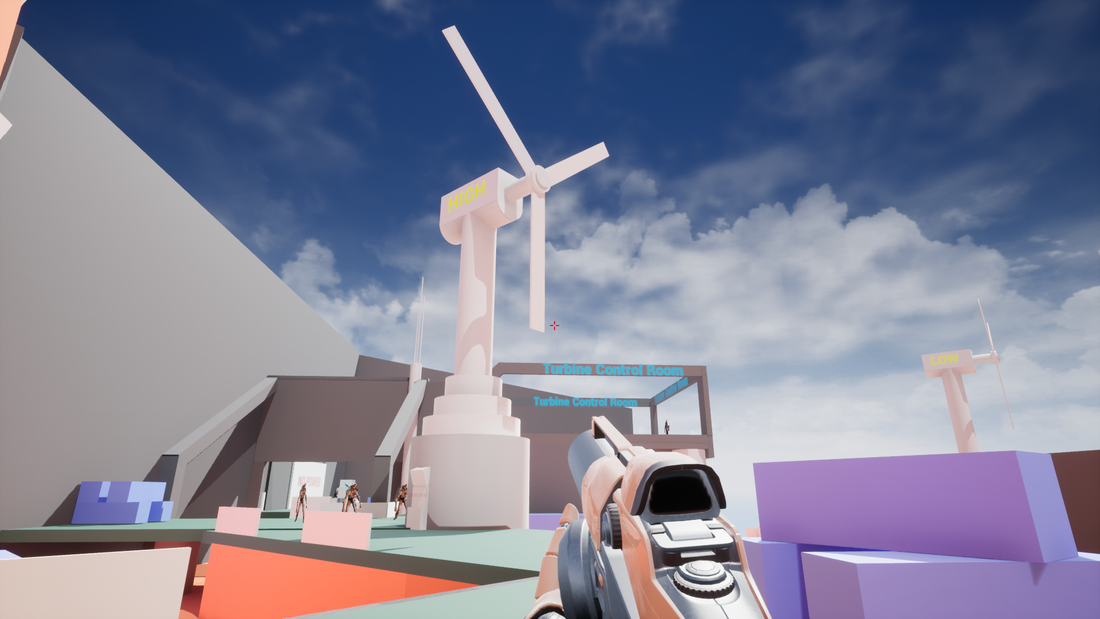
Turbine (HIGH).

Note:  Any enemies left on the map will now be alerted to the player's presence and give chase.
​
Picture
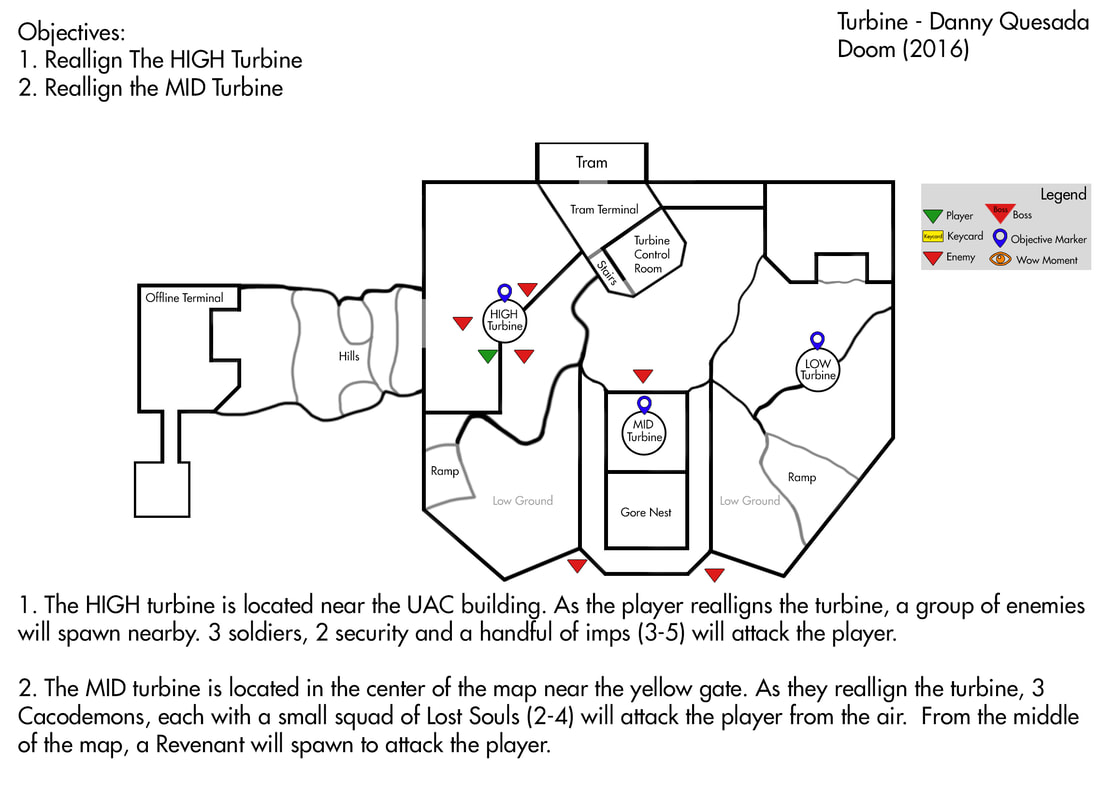
4/6
HIGH Turbine – This turbine is located near the UAC building on the top left of the map. After interacting with this turbine, nearby a squad of 3 soldiers, 2 security and a 3-5 imps will spawn nearby to attack the player.

MID Turbine – The mid turbine is located in the center of the map. After the player realigns it, 3 Cacodemons each with a small squad of lost souls (2-4) will approach the player from the cliffs. From the center crater in the middle of the map, a Revenant will join the fray. All the enemies in this wave can fly and will easily be able to chase the player.

LOW Turbine – The low turbine is located near a cliff on the right side of the map. After the player interacts with it, A pair of Cacodemons with 3 Lost souls will spawn as well as a squad of 6 imps and pair of Revenants fly in from the center of the stage.

Picture
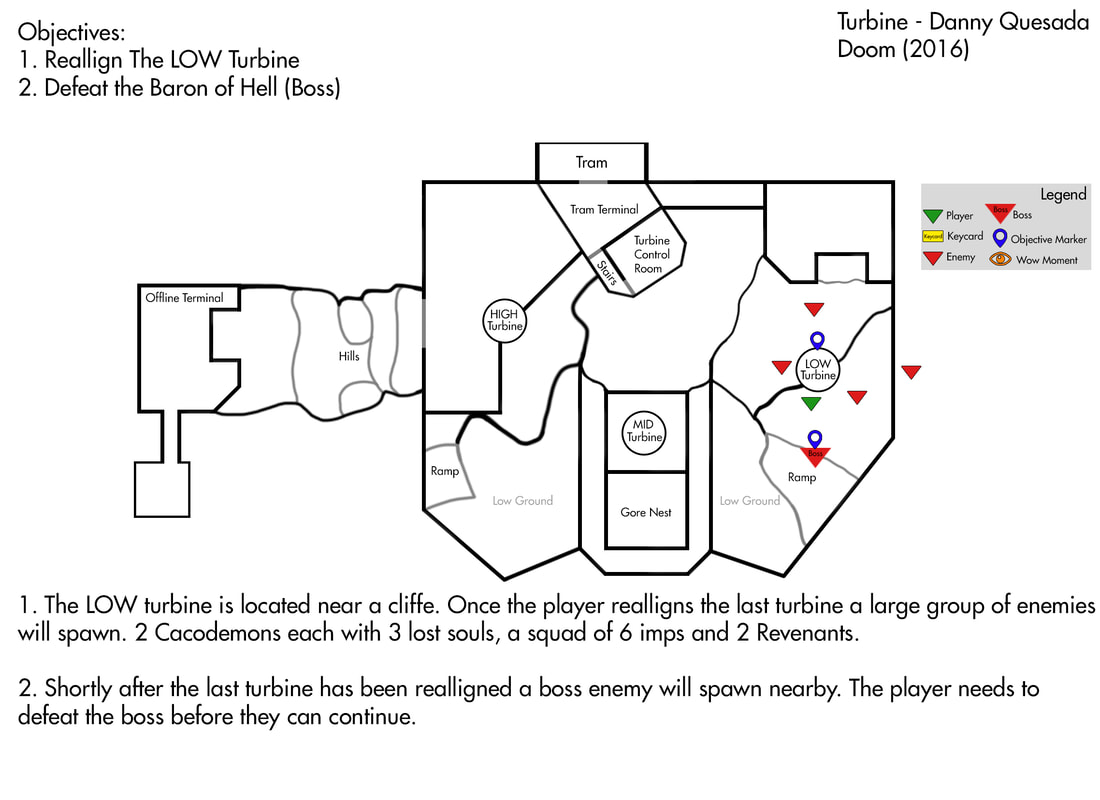
5/6
Boss Encounter – Shortly after the player has realigned the last turbine a Baron of hell will spawn on the map near the that turbine. The Baron will chase the player across the stage aggressively. It will jump and climb over the terrain/structures to get to the player.
Picture
Defeating the Boss.
- Once the boss has been injured enough to be staggered (reach the point where a glory kill can be performed) the player will be notified that the turbines have almost generated enough electricity to get the tram terminal back online.

- After the player has killed the boss they will be notified that power has been restored and the tram terminal is now fully operational. 
​​​

5. End of Mission
Picture
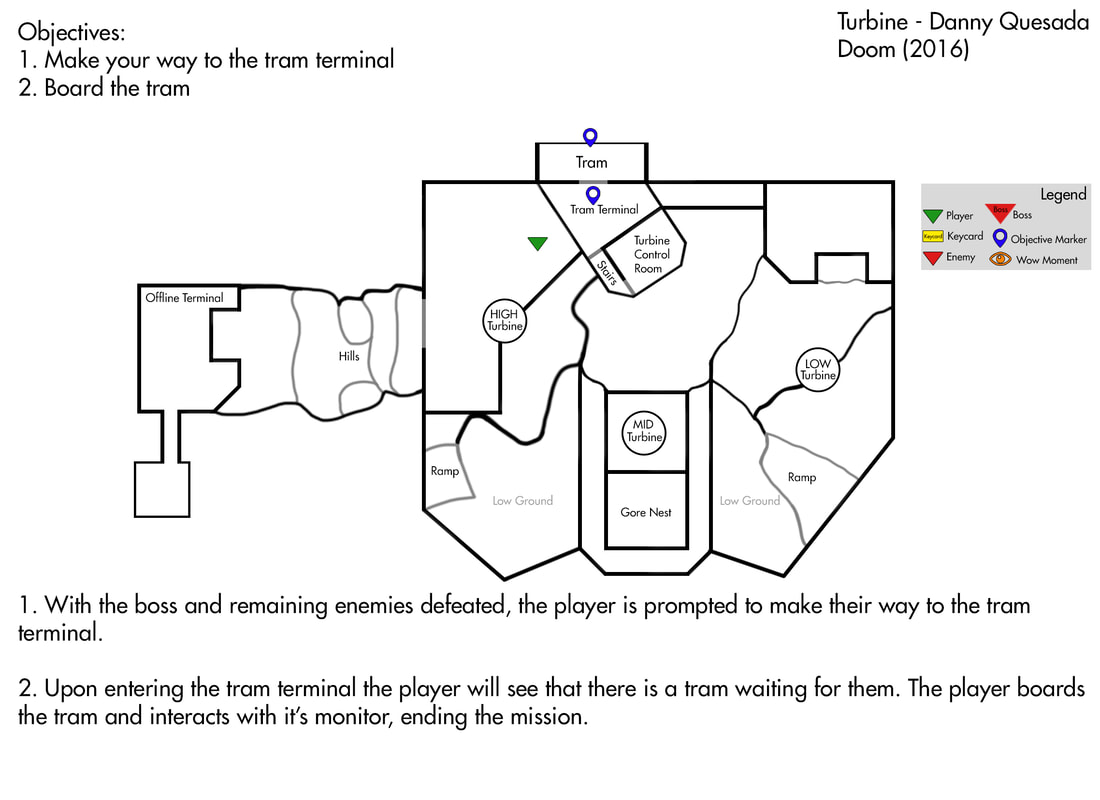
6/6
- With all of the demons vanquished, and the terminal back online all the player needs to do is head back to the tram, board it and interact with the monitor onboard to end the level.  ​

Home
Projects
Resume

- @Dannylv100
<<Previous
    Picture

    Picture
    Picture

    Popular Posts

    Poppy's Playtime Design Test
    ​Gears 4 - COG Hammerburst ​
    Knights vs Ninjas (Part 1)
    Halo 5: Warzone Accessibility 
    New The Last of Us Enemy
    Mass Effect 3: Tracker Class
    Mass Effect 3: DLC classes 
    ​Frosty's: Lost Levels
    ​
    Frosty's: Soundtrack
    ​Importing to UDK from Max
    Warframe: Sum of Their parts Quest

    Archives

    February 2025
    August 2024
    April 2024
    February 2024
    January 2023
    September 2022
    October 2019
    August 2019
    April 2019
    March 2019
    January 2019
    October 2018
    July 2018
    April 2018
    January 2018
    October 2017
    August 2017
    July 2017
    May 2017
    April 2017
    February 2017
    December 2016
    November 2016
    October 2016
    September 2016
    August 2016
    July 2016
    April 2016
    March 2016
    January 2016
    November 2015
    April 2014
    February 2014
    July 2013
    October 2012
    September 2011

    RSS Feed

Powered by Create your own unique website with customizable templates.